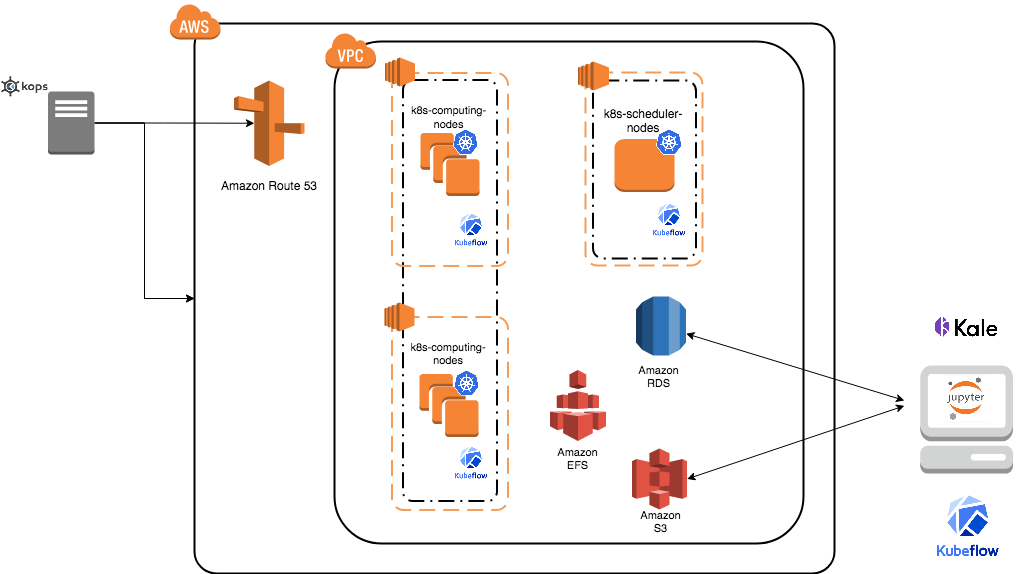
Cluster creation (first time only)
Kube SIPECAM cluster uses Kubernetes which is an open-source system for automating deployment, scaling, and management of containerized applications (see Kubernetes and Kubernetes github page ).
The nex steps follow kops and kops - Kubernetes Operations guides (another guide: Step Zero Kubernetes on AWS).
Configure a domain and a subdomain with their respective hosted zones. For the following description Route 53 service of AWS was used to create domain
conabio-route53.netand subdomainantares3.conabio-route53.net. Also a gossip based Kubernetes cluster can be used instead (see for example this issue ).Install same versions of kops and kubectl. You can use a
t2.microec2 instance with AMIUbuntu 20.04 LTSand a role attached to it withAmazonEc2FullAccessto install this tools and label it with the next bash script:
Note: change region in next bash script where you deployed t2.micro instance
#!/bin/bash
##variables:
region=<region>
name_instance=deploy-k8s
shared_volume=/shared_volume
user=ubuntu
##System update
export DEBIAN_FRONTEND=noninteractive
apt-get update -yq
##Install awscli
apt-get install -y python3-pip && pip3 install --upgrade pip
pip3 install awscli --upgrade
##Tag instance
INSTANCE_ID=$(curl -s http://instance-data/latest/meta-data/instance-id)
PUBLIC_IP=$(curl -s http://instance-data/latest/meta-data/public-ipv4)
aws ec2 create-tags --resources $INSTANCE_ID --tag Key=Name,Value=$name_instance-$PUBLIC_IP --region=$region
##Set variables for completion of bash commands
echo "export LC_ALL=C.UTF-8" >> /home/$user/.profile
echo "export LANG=C.UTF-8" >> /home/$user/.profile
##Set variable mount_point
echo "export mount_point=$shared_volume" >> /home/$user/.profile
##Useful software for common operations
apt-get install -y nfs-common jq git htop nano
##Create shared volume
mkdir $shared_volume
##install docker for ubuntu:
apt-get install -y apt-transport-https ca-certificates curl software-properties-common
curl -fsSL https://download.docker.com/linux/ubuntu/gpg | sudo apt-key add -
add-apt-repository "deb [arch=amd64] https://download.docker.com/linux/ubuntu $(lsb_release -cs) stable"
apt-get update -yq
apt-get install -y docker-ce
service docker start
##install kops version 1.14.0:
wget -O kops https://github.com/kubernetes/kops/releases/download/1.14.0/kops-linux-amd64
chmod +x ./kops
sudo mv ./kops /usr/local/bin/
##install kubernetes command line tool v1.14: kubectl
wget -O kubectl https://storage.googleapis.com/kubernetes-release/release/v1.14.0/bin/linux/amd64/kubectl
chmod +x ./kubectl
sudo mv ./kubectl /usr/local/bin/kubectl
##enable completion for kubectl:
echo "source <(kubectl completion bash)" >> /home/$user/.bashrc
You can check kops and kubectl versions with:
kops version
kubectl version
Note
All kubectl and kops commands must be executed in this instance.
Set next bash variables:
#Your domain name that is hosted in AWS Route 53
#Use: export DOMAIN_NAME="antares3.k8s.local" #for a gossip based cluster
export DOMAIN_NAME="antares3.conabio-route53.net"

# Friendly name to use as an alias for your cluster
export CLUSTER_ALIAS="k8s-deployment"

# Leave as-is: Full DNS name of you cluster
export CLUSTER_FULL_NAME="${CLUSTER_ALIAS}.${DOMAIN_NAME}"

# AWS availability zone where the cluster will be created
export CLUSTER_AWS_AZ=us-west-2a,us-west-2b,us-west-2c

# Leave as-is: AWS Route 53 hosted zone ID for your domain (don't set it if gossip based cluster is used)
export DOMAIN_NAME_ZONE_ID=$(aws route53 list-hosted-zones \
       | jq -r '.HostedZones[] | select(.Name=="'${DOMAIN_NAME}'.") | .Id' \
       | sed 's/\/hostedzone\///')

export KUBERNETES_VERSION="1.14.0"

#To hold cluster state information export KOPS_STATE_STORE
export KOPS_STATE_STORE="s3://${CLUSTER_FULL_NAME}-state"

export EDITOR=nano
Create AWS S3 bucket to hold information for Kubernetes cluster:
Note
The instance needs the policy AmazonS3FullAccess attach to a role created by you to have permissions to execute next command.
#Bucket will be created in us-east (N. Virginia)
aws s3api create-bucket --bucket ${CLUSTER_FULL_NAME}-state
Create group and user kops and generate access keys for user kops:
Note
The instance needs the policy IAMFullAccess attach to a role created by you to have permissions to execute next command.
Create group and permissions of it:
name=kops
aws iam create-group --group-name $name
aws iam attach-group-policy --policy-arn arn:aws:iam::aws:policy/AmazonEC2FullAccess --group-name $name
aws iam attach-group-policy --policy-arn arn:aws:iam::aws:policy/AmazonRoute53FullAccess --group-name $name
aws iam attach-group-policy --policy-arn arn:aws:iam::aws:policy/AmazonS3FullAccess --group-name $name
aws iam attach-group-policy --policy-arn arn:aws:iam::aws:policy/IAMFullAccess --group-name $name
aws iam attach-group-policy --policy-arn arn:aws:iam::aws:policy/AmazonVPCFullAccess --group-name $name
aws iam attach-group-policy --policy-arn arn:aws:iam::aws:policy/AmazonElasticFileSystemFullAccess --group-name $name
Create user kops and add it to already created group kops:
aws iam create-user --user-name $name
aws iam add-user-to-group --user-name $name --group-name $name
Create access keys for user kops:
aws iam create-access-key --user-name $name
This will generate an AccessKeyId and SecretAccessKey that must be kept in a safe place. Use them to configure awscli and set next variables:
aws configure
        AWS Access Key ID [None]: xxxx
        AWS Secret Access Key [None]: xxxxxxx
        Default region name [None]: <leave it empty>
        Default output format [None]: <leave it empty>

export AWS_ACCESS_KEY_ID=$(aws configure get aws_access_key_id)

export AWS_SECRET_ACCESS_KEY=$(aws configure get aws_secret_access_key)
Create a Key Pair with AWS console and a Public Key. See Amazon EC2 Key Pairs sections: Creating a Key Pair Using Amazon EC2 and Creating a Key Pair Using Amazon EC2. Save the Public Key in
/home/ubuntu/.ssh/id_rsa.pub.Deploy Kubernetes Cluster. An example is:
kops create cluster \
--name=${CLUSTER_FULL_NAME} \
--zones=${CLUSTER_AWS_AZ} \
--master-size="t2.medium" \
--node-size="t2.medium" \
--node-count="1" \
--dns-zone=${DOMAIN_NAME} \
--ssh-public-key="/home/ubuntu/.ssh/id_rsa.pub" \
--kubernetes-version=${KUBERNETES_VERSION}

kops update cluster --name ${CLUSTER_FULL_NAME} --yes
Note
Check status of cluster with kops validate cluster and wait until it says Your cluster $CLUSTER_FULL_NAME is ready
Note
You can delete cluster with: $kops delete cluster ${CLUSTER_FULL_NAME} and then $kops delete cluster ${CLUSTER_FULL_NAME} --yes (without yes flag you only see what changes are going to be applied) and don’t forget to delete S3 bucket: $aws s3api delete-bucket --bucket ${CLUSTER_FULL_NAME}-state after cluster deletion.
Note
You can scale up/down nodes of cluster with command: $kops edit ig nodes --name $CLUSTER_FULL_NAME, edit screen that appears and set 3/0 number of instances in minSize, maxSize values (3 is an example) and then $kops update cluster $CLUSTER_FULL_NAME and $kops update cluster $CLUSTER_FULL_NAME --yes to apply changes. Command kops validate cluster is useful to see state of cluster.
Note
To scale up/down master you can use: $kops edit ig master-us-west-2a --name $CLUSTER_FULL_NAME (you can check your instance type of master with: $kops get instancegroups) set 1/0 number of instances in minSize, maxSize values and then $kops update cluster $CLUSTER_FULL_NAME and $kops update cluster $CLUSTER_FULL_NAME --yes to apply changes. Command kops validate cluster is useful to see state of cluster.
¿How do I ssh to an instance of Kubernetes Cluster?
Using the key-pem already created for the kops user execute:
ssh -i <key>.pem admin@api.$CLUSTER_FULL_NAME
Note
Make sure this <key>.pem has 400 permissions: $chmod 400 <key>.pem.
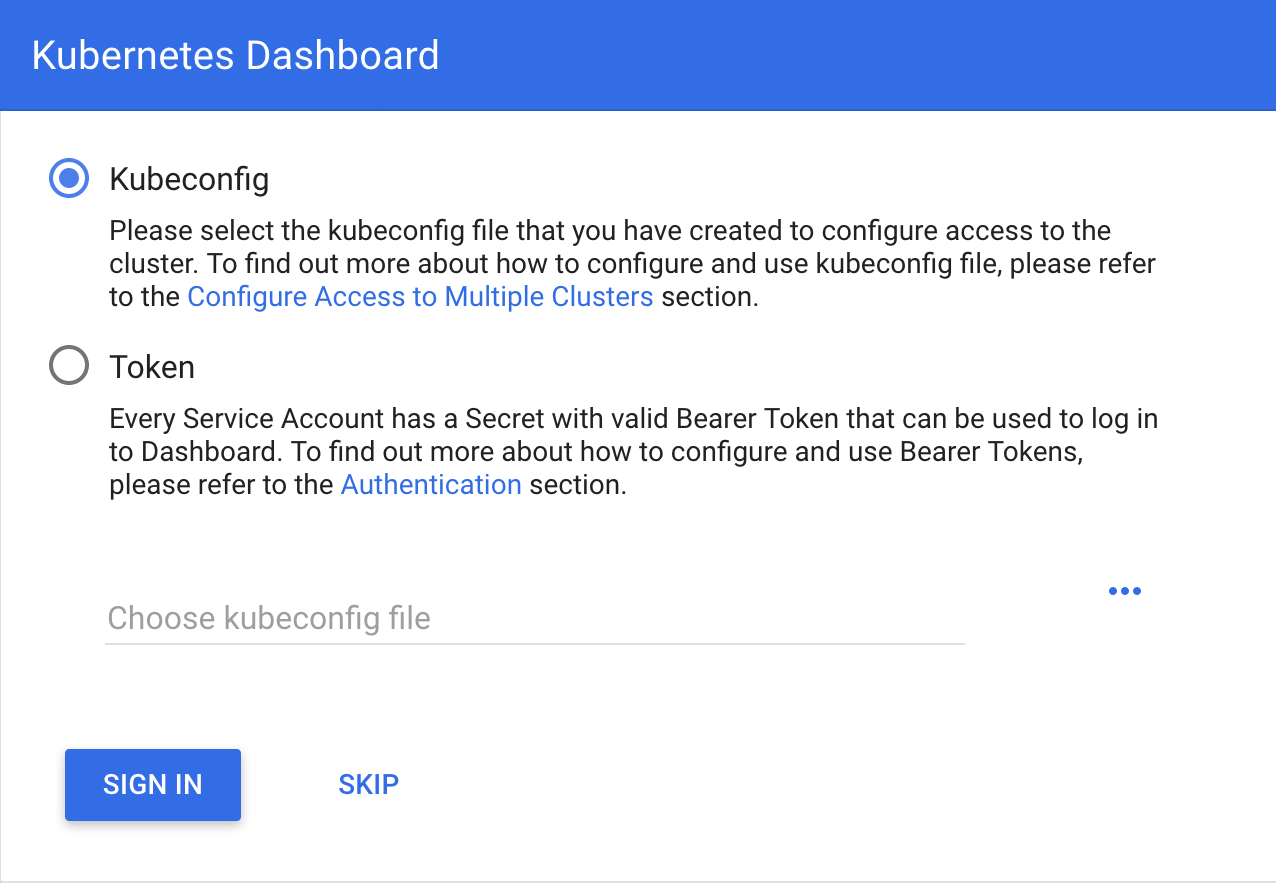
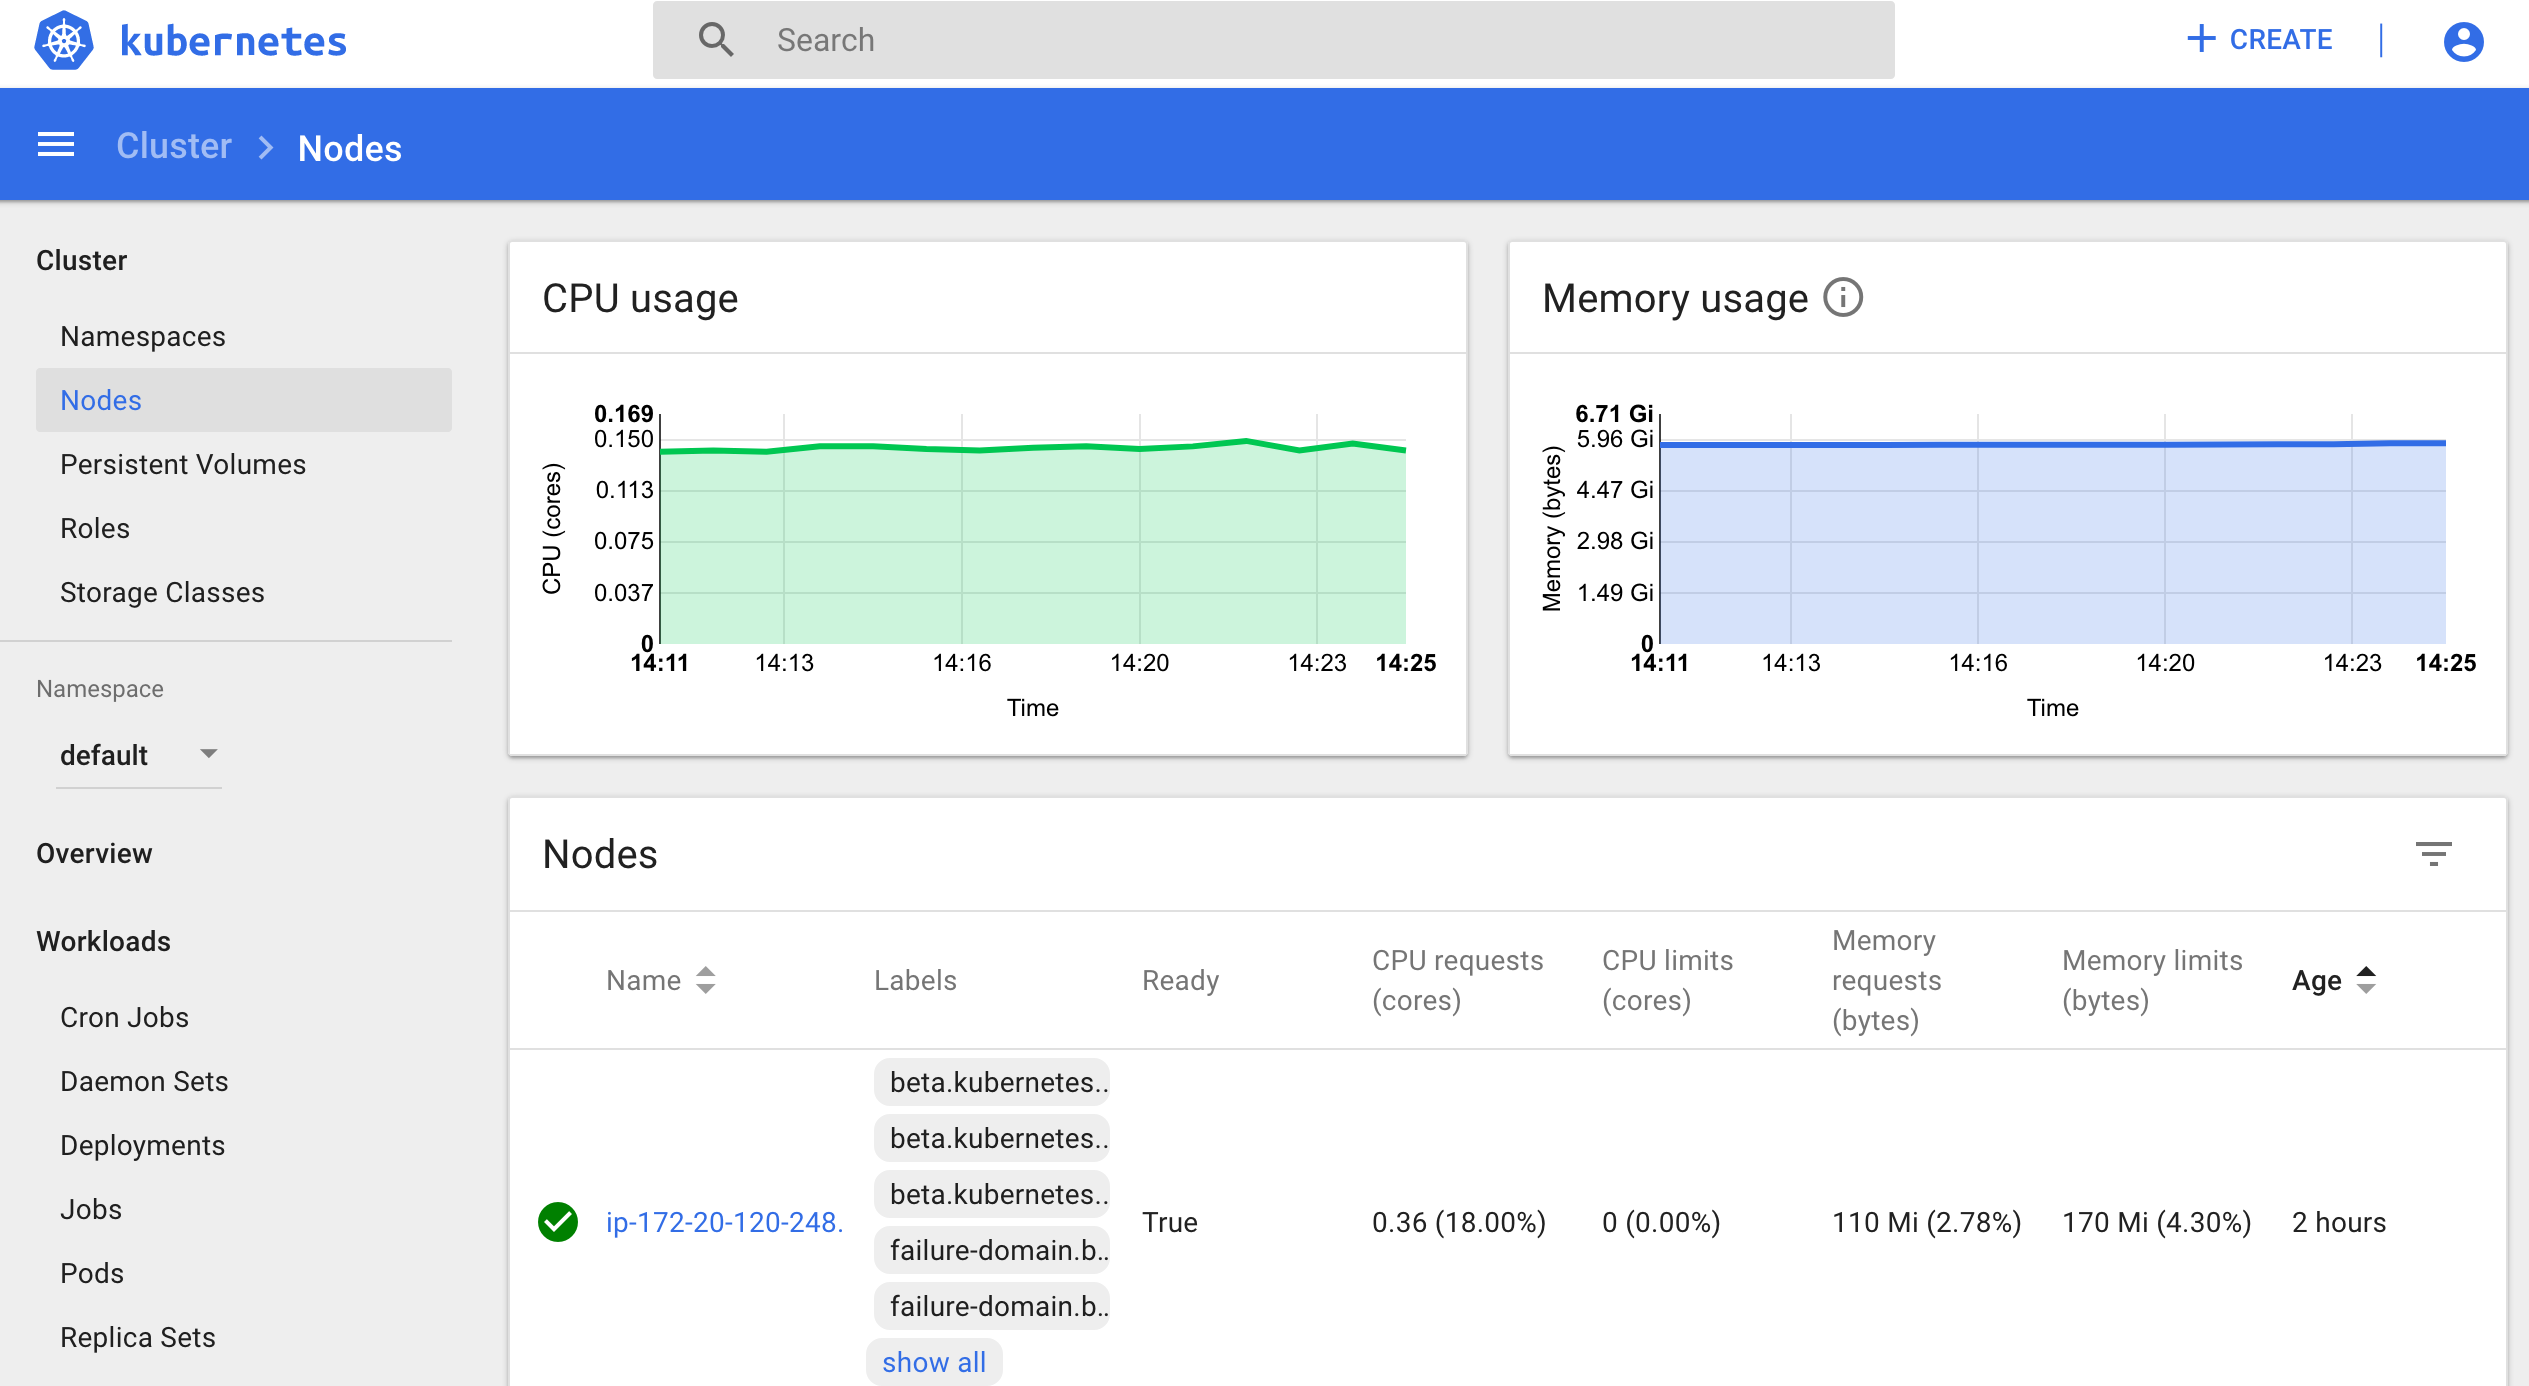
You can also deploy kubernetes dashboard for your cluster.
Kubernetes dashboard
According to Kubernetes Dashboard kubernetes dashboard is a general purpose, web-based UI for kubernetes clusters. It allows users to manage applications running in the cluster and troubleshoot them, as well as manage the cluster itself.
Next steps are based on: Certificate management, Installation, Accessing Dashboard 1.7.X and above and Creating sample user from kubernetes official documentation and installation of Certbot for Ubuntu (18.04) bionic and certbot-dns-route53 to generate certificates and access kubernetes dashboard via https.
Install certbot and Route53 plugin for Let’s Encrypt client:
sudo apt-get install -y certbot
#check version of certbot and install route53 plugin:
certbot_v=$(certbot --version|cut -d' ' -f2)
sudo pip3 install certbot_dns_route53==$certbot_v
Create some useful directories:
mkdir -p ~/letsencrypt/log/
mkdir -p ~/letsencrypt/config/
mkdir -p ~/letsencrypt/work/
Using kubectl retrieve where is kubernetes master running:
kubectl cluster-info
Kubernetes master is running at <location>
KubeDNS is running at <location>/api/v1/namespaces/kube-system/services/kube-dns:dns/proxy

To further debug and diagnose cluster problems, use 'kubectl cluster-info dump'.
Generate certificate for the <location> (remove https if it’s the case, just the dns name) of last command (make sure to save directory letsencrypt in a safe place):
$certbot certonly -d <location> --dns-route53 --logs-dir letsencrypt/log/ --config-dir letsencrypt/config/ --work-dir letsencrypt/work/ -m myemail@myinstitution --agree-tos --non-interactive --dns-route53-propagation-seconds 20
Note
Make sure you save the date that will expire your certificate. To renew certificate execute:
certbot renew --dns-route53 --logs-dir letsencrypt/log/ \
 --config-dir letsencrypt/config/ --work-dir letsencrypt/work/ \
 --non-interactive
Note
Also you need to have some symlinks created under directory: letsencrypt/config/live/<location>:
cert.pem -> ../../archive/<location>/cert1.pem
chain.pem -> ../../archive/<location>/chain1.pem
fullchain.pem -> ../../archive/<location>/fullchain1.pem
privkey.pem -> ../../archive/<location>/privkey1.pem
Create directory certs and copy cert and private key:
mkdir certs
cp letsencrypt/config/archive/<location>/fullchain1.pem certs/
cp letsencrypt/config/archive/<location>/privkey1.pem certs/
Note
When renewing your certificate the latest ones will be symlinks located: letsencrypt/config/live/<location>/. See Where are my certificates?
Retrieve yaml to deploy kubernetes dashboard and change some values:
curl -O https://raw.githubusercontent.com/kubernetes/dashboard/v2.2.0/aio/deploy/recommended.yaml
sed -ni 's/- --auto-generate-certificates/#- --auto-generate-certificates/;p' recommended.yaml
sed -i '/args:/a \ \ \ \ \ \ \ \ \ \ \ \ - --tls-cert-file=fullchain1.pem' recommended.yaml
sed -i '/args:/a \ \ \ \ \ \ \ \ \ \ \ \ - --tls-key-file=privkey1.pem' recommended.yaml
Create deployments and services with kubernetes-dashboard.yaml :
kubectl apply -f recommended.yaml
Delete certs and recreate secrets using the .pem that we created with certbot:
kubectl delete secret kubernetes-dashboard-certs -n kubernetes-dashboard
kubectl create secret generic kubernetes-dashboard-certs --from-file=certs -n kubernetes-dashboard
You can check that containers are running by executing:
kubectl -n kubernetes-dashboard get pods
To visualize kubernetes-dashboard one possibility is to change type ClusterIP to NodePort (see Accessing Dashboard 1.7.X and above) when executing next command:
kubectl edit service kubernetes-dashboard -n kubernetes-dashboard
and get port with:
kubectl get service kubernetes-dashboard -n kubernetes-dashboard
Open port retrieved by last command in masters security group of kubernetes cluster with aws console. In your browser type:
https://<location>:<port>
Documentation of Creating sample user can be used to access via token generation. Use:
kubectl -n kubernetes-dashboard describe secret $(kubectl -n kubernetes-dashboard get secret | grep admin-user | awk '{print $1}')
to retrieve token.
To scale down components of kubernetes dashboard:
kubectl -n kubernetes-dashboard scale deployments/dashboard-metrics-scraper --replicas=0
kubectl -n kubernetes-dashboard scale deployments/kubernetes-dashboard --replicas=0
To scale up components of kubernetes dashboard:
kubectl -n kubernetes-dashboard scale deployments/dashboard-metrics-scraper --replicas=1
kubectl -n kubernetes-dashboard scale deployments/kubernetes-dashboard --replicas=1
To delete components of kubernetes dashboard:
#delete admin-user created:

kubectl -n kubernetes-dashboard delete serviceaccount admin-user
kubectl -n kubernetes-dashboard delete ClusterRoleBinding admin-user

#delete dashboard components:
kubectl delete deployment kubernetes-metrics-scraper -n kubernetes-dashboard
kubectl delete deployment kubernetes-dashboard -n kubernetes-dashboard
kubectl delete service dashboard-metrics-scraper -n kubernetes-dashboard
kubectl delete clusterrolebinding kubernetes-dashboard -n kubernetes-dashboard
kubectl delete rolebinding kubernetes-dashboard -n kubernetes-dashboard
kubectl delete clusterrole kubernetes-dashboard -n kubernetes-dashboard
kubectl delete role kubernetes-dashboard -n kubernetes-dashboard
kubectl delete configmap kubernetes-dashboard-settings -n kubernetes-dashboard
kubectl delete secret kubernetes-dashboard-key-holder -n kubernetes-dashboard
kubectl delete secret kubernetes-dashboard-csrf -n kubernetes-dashboard
kubectl delete service kubernetes-dashboard -n kubernetes-dashboard
kubectl delete serviceaccount kubernetes-dashboard -n kubernetes-dashboard
kubectl delete secret kubernetes-dashboard-certs -n kubernetes-dashboard
kubectl delete namespace kubernetes-dashboard -n kubernetes-dashboard
Jupyterlab deployment for pipelines
Create deployment kale-jupyterlab that has Kale installed:
LOAD_BALANCER_SERVICE=loadbalancer-0.6.1-efs
JUPYTERLAB_SERVICE_HOSTPATH_PV=jupyterlab-cert-0.6.1-efs
URL=https://raw.githubusercontent.com/CONABIO/kube_sipecam/master/deployments/jupyterlab_cert/
kubectl create -f $URL/efs/$LOAD_BALANCER_SERVICE.yaml
kubectl create -f $URL/efs/$JUPYTERLAB_SERVICE_HOSTPATH_PV.yaml
Check Yamls for kale-jupyterlab deployment for last version.
Cluster deployment
Once cluster is created in us-west-2 region launch a t2.micro instance with AMI Ubuntu-20.04 in which we will execute kubectl commands to deploy cluster.
Use next bash script which will install docker, kops and kubectl. Also choose a suitable name for your instance and write it as value of name_instance variable.
#!/bin/bash
##variables:
region=us-west-2
name_instance=deploy-k8s
shared_volume=/shared_volume
user=ubuntu
##System update
export DEBIAN_FRONTEND=noninteractive
apt-get update -yq
##Install awscli
apt-get install -y python3-pip && pip3 install --upgrade pip
pip3 install awscli --upgrade
##Tag instance
INSTANCE_ID=$(curl -s http://instance-data/latest/meta-data/instance-id)
PUBLIC_IP=$(curl -s http://instance-data/latest/meta-data/public-ipv4)
aws ec2 create-tags --resources $INSTANCE_ID --tag Key=Name,Value=$name_instance-$PUBLIC_IP --region=$region
##Set variables for completion of bash commands
echo "export LC_ALL=C.UTF-8" >> /home/$user/.profile
echo "export LANG=C.UTF-8" >> /home/$user/.profile
##Set variable mount_point
echo "export mount_point=$shared_volume" >> /home/$user/.profile
##Useful software for common operations
apt-get install -y nfs-common jq git htop nano
##Create shared volume
mkdir $shared_volume
##install docker for ubuntu:
apt-get install -y apt-transport-https ca-certificates curl software-properties-common
curl -fsSL https://download.docker.com/linux/ubuntu/gpg | sudo apt-key add -
add-apt-repository "deb [arch=amd64] https://download.docker.com/linux/ubuntu $(lsb_release -cs) stable"
apt-get update -yq
apt-get install -y docker-ce
service docker start
##install kops version 1.19.0:
wget -O kops https://github.com/kubernetes/kops/releases/download/v1.19.1/kops-linux-amd64
chmod +x ./kops
sudo mv ./kops /usr/local/bin/
##install kubernetes command line tool v1.19: kubectl
wget -O kubectl https://storage.googleapis.com/kubernetes-release/release/v1.19.1/bin/linux/amd64/kubectl
chmod +x ./kubectl
sudo mv ./kubectl /usr/local/bin/kubectl
##enable completion for kubectl:
echo "source <(kubectl completion bash)" >> /home/$user/.bashrc
Scale up of worker nodes
Use ssh to login to ec2 instance. Choose which type of cluster you will use and set next variables accordingly:
# For testing

export DOMAIN_NAME="dummy.route53-kube-sipecam.net"
export CLUSTER_ALIAS="k8s-dummy"
export CLUSTER_FULL_NAME="${CLUSTER_ALIAS}.${DOMAIN_NAME}"
export KUBERNETES_VERSION="1.19.1"
export KOPS_STATE_STORE="s3://${CLUSTER_FULL_NAME}-state"
export EDITOR=nano

# For production

export DOMAIN_NAME="proc-sys.route53-kube-sipecam.net"
export CLUSTER_ALIAS="k8s"
export CLUSTER_FULL_NAME="${CLUSTER_ALIAS}.${DOMAIN_NAME}"
export KUBERNETES_VERSION="1.19.1"
export KOPS_STATE_STORE="s3://${CLUSTER_FULL_NAME}-state"
export EDITOR=nano
Scale up worker nodes of cluster using kops.
kops edit ig nodes-us-west-2a --name $CLUSTER_FULL_NAME
Note
If you will use GPU then add under spec next lines:
spec:
  additionalUserData:
  - name: install_dependencies_for_kube_sipecam_gpu.sh
    type: text/x-shellscript
    content: |-
      #!/bin/bash
      sudo apt-get update && sudo apt-get install -y build-essential
      #install nvidia driver
      nv_driver=460.32.03
      nv_driver_run=NVIDIA-Linux-x86_64-460.32.03.run
      cd ~ && wget http://us.download.nvidia.com/tesla/$nv_driver/$nv_driver_run
      chmod a+x $nv_driver_run
      sudo ./$nv_driver_run --accept-license --silent
      #install nvidia-docker2
      curl -s -L https://nvidia.github.io/nvidia-docker/gpgkey | sudo apt-key add -
      distribution=$(. /etc/os-release;echo $ID$VERSION_ID)
      curl -s -L https://nvidia.github.io/nvidia-docker/$distribution/nvidia-docker.list | sudo tee /etc/apt/sources.list.d/nvidia-docker.list
      sudo apt-get update
      sudo apt-get install -y nvidia-docker2
      sudo systemctl restart docker
      sudo su && echo '{"default-runtime": "nvidia","runtimes": {"nvidia": {"path": "/usr/bin/nvidia-container-runtime","runtimeArgs": []}}}' > /etc/docker/daemon.json && pkill -SIGHUP dockerd && systemctl restart kubelet
  image: 099720109477/ubuntu/images/hvm-ssd/ubuntu-focal-20.04-amd64-server-20210315
  machineType: p2.xlarge
Next line is just to see what changes are going to be applied.
kops update cluster --name $CLUSTER_FULL_NAME
Apply the changes.
kops update cluster --name $CLUSTER_FULL_NAME --yes --admin
Next line is useful to know when cluster is ready.
kops validate cluster --wait 10m
Scale up of components
When cluster is ready scale up next:
Dashboard components
kubectl -n kubernetes-dashboard scale deployments/dashboard-metrics-scraper --replicas=1
kubectl -n kubernetes-dashboard scale deployments/kubernetes-dashboard --replicas=1
Get port of dashboard UI with:
kubectl get service kubernetes-dashboard -n kubernetes-dashboard
Access dashboard UI:
https://api.$CLUSTER_ALIAS.$DOMAIN_NAME:<port retrieved with last command>
Elastic File System
kubectl -n kubeflow scale deployments/nfs-client-provisioner --replicas=1
Kubeflow components
kubectl scale -n kubeflow deployment cache-deployer-deployment --replicas=1
kubectl scale -n kubeflow deployment cache-server --replicas=1
kubectl scale -n kubeflow deployment workflow-controller --replicas=1
kubectl scale -n kubeflow deployment ml-pipeline-ui --replicas=1
kubectl scale -n kubeflow deployment ml-pipeline-scheduledworkflow --replicas=1
kubectl scale -n kubeflow deployment ml-pipeline-persistenceagent --replicas=1
kubectl scale -n kubeflow deployment ml-pipeline --replicas=1
kubectl scale -n kubeflow deployment metadata-writer --replicas=1
kubectl scale -n kubeflow deployment metadata-envoy-deployment --replicas=1
kubectl scale -n kubeflow deployment metadata-grpc-deployment --replicas=1
kubectl scale -n kubeflow deployment ml-pipeline-viewer-crd --replicas=1
kubectl scale -n kubeflow deployment ml-pipeline-visualizationserver --replicas=1
kubectl scale -n kubeflow deployment mysql --replicas=1
kubectl scale -n kubeflow deployment controller-manager --replicas=1
Get port of kubeflow UI with:
kubectl get service ml-pipeline-ui -n kubeflow
Access kubeflow dashboard UI:
http://api.$CLUSTER_ALIAS.$DOMAIN_NAME:<port retrieved with last command>
Jupyterlab service
kubectl -n kubeflow scale deployments/kale-jupyterlab --replicas=1
Access jupyterlab UI:
https://api.$CLUSTER_ALIAS.$DOMAIN_NAME:30001/myurl
Scale down of components
Once the work is done scale down next:
Kubeflow components
kubectl scale -n kubeflow deployment cache-deployer-deployment --replicas=0
kubectl scale -n kubeflow deployment cache-server --replicas=0
kubectl scale -n kubeflow deployment workflow-controller --replicas=0
kubectl scale -n kubeflow deployment ml-pipeline-ui --replicas=0
kubectl scale -n kubeflow deployment ml-pipeline-scheduledworkflow --replicas=0
kubectl scale -n kubeflow deployment ml-pipeline-persistenceagent --replicas=0
kubectl scale -n kubeflow deployment ml-pipeline --replicas=0
kubectl scale -n kubeflow deployment metadata-writer --replicas=0
kubectl scale -n kubeflow deployment metadata-envoy-deployment --replicas=0
kubectl scale -n kubeflow deployment metadata-grpc-deployment --replicas=0
kubectl scale -n kubeflow deployment ml-pipeline-viewer-crd --replicas=0
kubectl scale -n kubeflow deployment ml-pipeline-visualizationserver --replicas=0
kubectl scale -n kubeflow deployment mysql --replicas=0
kubectl scale -n kubeflow deployment controller-manager --replicas=0
Dashboard components
kubectl -n kubernetes-dashboard scale deployments/dashboard-metrics-scraper --replicas=0
kubectl -n kubernetes-dashboard scale deployments/kubernetes-dashboard --replicas=0
Elastic File System
kubectl -n kubeflow scale deployments/nfs-client-provisioner --replicas=0
Jupyterlab service
kubectl -n kubeflow scale deployments/kale-jupyterlab --replicas=0
Scale down of worker nodes
Wait 5 minutes then scale down worker nodes of cluster using kops.
kops edit ig nodes-us-west-2a --name $CLUSTER_FULL_NAME
Next line is just to see what changes are going to be applied.
kops update cluster --name $CLUSTER_FULL_NAME
Apply the changes.
kops update cluster --name $CLUSTER_FULL_NAME --yes --admin
Terminate t2.micro instance.