Amazon Web Services
Prerequisites
* Configure Amazon Virtual Private Cloud on AWS with properly VPCs and Subnets configured according to your application.
* Configure Security Groups for Your VPC with ports 6444 TCP and 6445 UDP for communication within instances via SGE and port 80 for web SGE, port 2043 for Amazon Elastic File System service on AWS and port 22 to ssh to instances from your machine.
* Configure Amazon Elastic File System service on AWS (shared volume via Network File System -NFS-).
* Create a bucket on S3 (see Amazon S3) if using driver S3 of Open DataCube (see Open DataCube Ingestion Config). Boto3 Documentation and AWS suggests as a best practice using IAM Roles for Amazon EC2 to access this bucket. See Best Practices for Configuring Credentials.
* (Not mandatory but useful) Configure an Elastic IP Addresses on AWS. Master node will have this elastic ip.
* AWS provide a managed relational database service Amazon Relational Database Service (RDS) with several database instance types and a PostgreSQL database engine.
* Configure RDS with PostgreSQL version 9.5 + with properly Amazon RDS Security Groups , parameter and subnet group for the RDS configured (see Tutorial Create an Amazon VPC for Use with an Amazon RDS DB Instance).
* Configure Postgis extension to PostgreSQL for storing and managing spatial information in the instance of RDS you created.
Note
AWS gives you necessary steps to setup Postgis extension in Working with PostGis documentation.
We use the following bash script to setup Postgis extension in database instance:
#!/bin/bash
##First argument its the name of database created on RDS, following arguments are self explanatory
db=$1
db_user=$2
db_host=$3
psql -h $db_host -U $db_user --dbname=$db --command "create extension postgis;"
psql -h $db_host -U $db_user --dbname=$db --command "create extension fuzzystrmatch;"
psql -h $db_host -U $db_user --dbname=$db --command "create extension postgis_tiger_geocoder;"
psql -h $db_host -U $db_user --dbname=$db --command "create extension postgis_topology;"
psql -h $db_host -U $db_user --dbname=$db --command "alter schema tiger owner to rds_superuser;"
psql -h $db_host -U $db_user --dbname=$db --command "alter schema tiger_data owner to rds_superuser;"
psql -h $db_host -U $db_user --dbname=$db --command "alter schema topology owner to rds_superuser;"
psql -h $db_host -U $db_user --dbname=$db --command "CREATE FUNCTION exec(text) returns text language plpgsql volatile AS \$f\$ BEGIN EXECUTE \$1; RETURN \$1; END; \$f\$;"
psql -h $db_host -U $db_user --dbname=$db --command "SELECT exec('ALTER TABLE ' || quote_ident(s.nspname) || '.' || quote_ident(s.relname) || ' OWNER TO rds_superuser;') FROM (SELECT nspname, relname FROM pg_class c JOIN pg_namespace n ON (c.relnamespace = n.oid) WHERE nspname in ('tiger','topology') AND relkind IN ('r','S','v') ORDER BY relkind = 'S') s;"
Make sure a file
.pgpassis in/home/ubuntupath so you are not prompted with the password for every command. The contents of this file are:<db_host>:<port>:<name of database>:<name of database user>:<database password>and permissions of this
.pgpassare:$chmod 0600 ~/.pgpass* (Not mandatory but useful) You can either work with the database configured in RDS or create a new one with:
$createdb -h <db_host> -U <db_user> <database_name>
Sun Grid Engine and Dask
1. Create AMI of AWS from bash script.
Launch an instance with AMI Ubuntu 16.04 LTS.
The following bash script can be used in User data configuration of the instance to:
* Install AWS cli.
* Install package amazon-ssm-agent.deb to use RunCommand service of EC2.
Note
RunCommand service is not a mandatory installation for antares3, Open Datacube nor SGE, we use it for it’s simplicity to execute commands on all of the instances (see RunCommand). You can use instead clusterssh or other tool for cluster management.
* Tag your instance with Key Name and Value $name_instance.
* Install dependencies for SGE, antares3 and Open Datacube.
Note
Modify variables region, name_instance, shared_volume and user with your own configuration.
#!/bin/bash
##Bash script to create AMI of AWS for master and nodes:
##variables:
region=<region>
name_instance=conabio-dask-sge
shared_volume=/shared_volume
user=ubuntu
##System update
apt-get update
##Install awscli
apt-get install -y python3-pip && pip3 install --upgrade pip==9.0.3
pip3 install awscli --upgrade
##Tag instance
INSTANCE_ID=$(curl -s http://instance-data/latest/meta-data/instance-id)
PUBLIC_IP_LOCAL=$(curl -s http://instance-data/latest/meta-data/local-ipv4)
PUBLIC_IP=$(curl -s http://instance-data/latest/meta-data/public-ipv4)
aws ec2 create-tags --resources $INSTANCE_ID --tag Key=Name,Value=$name_instance-$PUBLIC_IP --region=$region
##Set locales for OpenDataCube
echo "export LC_ALL=C.UTF-8" >> /home/$user/.profile
echo "export LANG=C.UTF-8" >> /home/$user/.profile
##Set variable mount_point
echo "export mount_point=$shared_volume" >> /home/$user/.profile
##Dependencies for sge, antares3 and open datacube
apt-get install -y nfs-common openssh-server openjdk-8-jre xsltproc apache2 git htop postgresql-client \
python-software-properties \
libssl-dev \
libffi-dev \
python3-dev \
python3-setuptools
##For RunCommand service of EC2
wget https://s3.amazonaws.com/ec2-downloads-windows/SSMAgent/latest/debian_amd64/amazon-ssm-agent.deb
dpkg -i amazon-ssm-agent.deb
systemctl enable amazon-ssm-agent
##For web SGE
echo "<VirtualHost *:80>
    ServerAdmin webmaster@localhost
    DocumentRoot /var/www/
    ErrorLog ${APACHE_LOG_DIR}/error.log
    # Possible values include: debug, info, notice, warn, error, crit,
    # alert, emerg.
    LogLevel warn
    CustomLog ${APACHE_LOG_DIR}/access.log combined
    <Directory /var/www/qstat>
            Options +ExecCGI
            AddHandler cgi-script .cgi
               DirectoryIndex qstat.cgi
    </Directory>
</VirtualHost>
# vim: syntax=apache ts=4 sw=4 sts=4 sr noet" > /etc/apache2/sites-available/000-default.conf
git clone https://github.com/styv/webqstat.git /var/www/qstat
sed -i '/tools/s/./#./' /var/www/qstat/config.sh
a2enmod cgid
service apache2 start
##Install gridengine non interactively
export DEBIAN_FRONTEND=noninteractive
apt-get install -q -y gridengine-client gridengine-exec gridengine-master
/etc/init.d/gridengine-master restart
service apache2 restart
##Install spatial libraries
add-apt-repository -y ppa:ubuntugis/ubuntugis-unstable && apt-get -qq update
apt-get install -y \
    netcdf-bin \
    libnetcdf-dev \
    libproj-dev \
    libgeos-dev \
    gdal-bin \
    libgdal-dev
##Install dask distributed
pip3 install dask distributed --upgrade
pip3 install bokeh
##Install missing package for open datacube:
pip3 install --upgrade python-dateutil
##Create shared volume
mkdir $shared_volume
##Locale settings for open datacube
echo "alias python=python3" >> /home/$user/.bash_aliases
#dependencies for antares3 & datacube
pip3 install numpy==1.14.0 && pip3 install cloudpickle && pip3 install GDAL==$(gdal-config --version) --global-option=build_ext --global-option='-I/usr/include/gdal' && pip3 install rasterio==1 --no-binary rasterio && pip3 install scipy
pip3 install sklearn
pip3 install lightgbm
pip3 install fiona --no-binary fiona
pip3 install django
#datacube:
pip3 install git+https://github.com/opendatacube/datacube-core.git@develop#egg=datacube[s3]
Once launching of the instance was successful, log in and execute next commands:
Note
We use Elastic File System of AWS (shared file storage, see Amazon Elastic File System), which multiple Amazon EC2 instances running in multiple Availability Zones (AZs) within the same region can access it. Change variable efs_dns according to your DNS name.
efs_dns=<DNS name of EFS service>

##Mount shared volume
$sudo mount -t nfs4 -o nfsvers=4.1,rsize=1048576,wsize=1048576,hard,timeo=600,retrans=2 $efs_dns:/ $mount_point
Then open an editor an copy-paste next bash script in $mount_point/create-dask-sge-queue.sh file.
#!/bin/bash
#First parameter is name of queue on SGE
#Second parameter is number of slots that queue of SGE will have
#Third parameter is user
source /home/$user/.profile
queue_name=$1
slots=$2
type_value=$type_value
region=$region
qconf -am $user
##queue of SGE, this needs to be executed for registering nodes:
echo -e "group_name @allhosts\nhostlist NONE" > $mount_point/host_group_sge.txt
qconf -Ahgrp $mount_point/host_group_sge.txt
echo -e "qname                 $queue_name\nhostlist              NONE\nseq_no                0\nload_thresholds       np_load_avg=1.75\nsuspend_thresholds    NONE\nnsuspend              1\nsuspend_interval      00:05:00\npriority              0\nmin_cpu_interval      00:05:00\nprocessors            UNDEFINED\nqtype                 BATCH INTERACTIVE\nckpt_list             NONE\npe_list               make\nrerun                 FALSE\nslots                 1\ntmpdir                /tmp\nshell                 /bin/csh\nprolog                NONE\nepilog                NONE\nshell_start_mode      posix_compliant\nstarter_method        NONE\nsuspend_method        NONE\nresume_method         NONE\nterminate_method      NONE\nnotify                00:00:60\nowner_list            NONE\nuser_lists            NONE\nxuser_lists           NONE\nsubordinate_list      NONE\ncomplex_values        NONE\nprojects              NONE\nxprojects             NONE\ncalendar              NONE\ninitial_state         default\ns_rt                  INFINITY\nh_rt                  INFINITY\ns_cpu                 INFINITY\nh_cpu                 INFINITY\ns_fsize               INFINITY\nh_fsize               INFINITY\ns_data                INFINITY\nh_data                INFINITY\ns_stack               INFINITY\nh_stack               INFINITY\ns_core                INFINITY\nh_core                INFINITY\ns_rss                 INFINITY\nh_rss                 INFINITY\ns_vmem                INFINITY\nh_vmem                INFINITY" > $mount_point/queue_name_sge.txt
qconf -Aq $mount_point/queue_name_sge.txt
qconf -aattr queue hostlist @allhosts $queue_name
qconf -aattr queue slots $slots $queue_name
qconf -aattr hostgroup hostlist $HOSTNAME @allhosts
##Get IP's of instances using awscli
aws ec2 describe-instances --region=$region --filter Name=tag:Type,Values=$type_value --query 'Reservations[].Instances[].PrivateDnsName' |grep compute| cut -d'"' -f2 > $mount_point/nodes.txt
/bin/sh -c 'for ip in $(cat $mount_point/nodes.txt);do qconf -as $ip;done'
/bin/sh -c 'for ip in $(cat $mount_point/nodes.txt);do echo "hostname $ip \nload_scaling NONE\ncomplex_values NONE\nuser_lists NONE \nxuser_lists NONE\nprojects NONE\nxprojects NONE\nusage_scaling NONE\nreport_variables NONE " > $mount_point/ips_nodes_format_sge.txt; qconf -Ae $mount_point/ips_nodes_format_sge.txt ; qconf -aattr hostgroup hostlist $ip @allhosts ;done'
##echo IP of node master
echo $(hostname).$region.compute.internal > $mount_point/ip_master.txt
Once bash script was created unmount the shared volume and terminate instance:
$sudo umount $mount_point
You can use this instance to create AMI of AWS Create an AMI from an Amazon EC2 Instace.
2. Configure an Autoscaling group of AWS using AMI
Once created an AMI of AWS from previous step, use the following bash script to configure instances using Auto Scaling Groups service of AWS.
Note
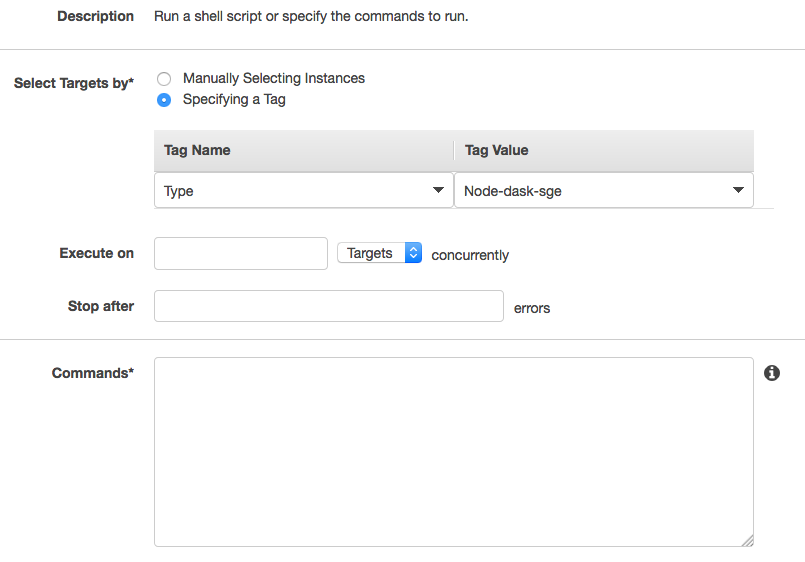
Modify variables region, name_instance, type_value and user with your own configuration. Here instances are tagged with Key Type and Value Node-dask-sge so we can use RunCommand service of AWS to execute bash scripts (for example) on instances with this tag.
#!/bin/bash
region=<region>
name_instance=conabio-dask-sge-node
type_value=Node-dask-sge
user=ubuntu
##Tag instances of type node
INSTANCE_ID=$(curl -s http://instance-data/latest/meta-data/instance-id)
PUBLIC_IP=$(curl -s http://instance-data/latest/meta-data/public-ipv4)
aws ec2 create-tags --resources $INSTANCE_ID --tag Key=Name,Value=$name_instance-$PUBLIC_IP --region=$region
##Next line is useful so RunCommand can execute bash scripts (for example) on instances with Key=Type, Value=$type_value
aws ec2 create-tags --resources $INSTANCE_ID --tag Key=Type,Value=$type_value --region=$region
echo "export region=$region" >> /home/$user/.profile
echo "export type_value=$type_value" >> /home/$user/.profile
##Uncomment next two lines if you want to install Antares3 on your AutoScalingGroup
#su $user -c "pip3 install --user git+https://github.com/CONABIO/antares3.git@develop"
#echo "export PATH=$PATH:/home/$user/.local/bin/" >> ~/.profile
Example using RunCommand service of AWS with Tag Name and Tag Value
3. Init Cluster
Example with one master and two nodes. Install Open DataCube and Antares3 in all nodes.
Using instances of Auto Scaling Groups configured in step 2 we have to configure SGE queue on master node and register nodes on this queue.
3.1 Assign Elastic IP to master node and create Sun Grid Engine queue
Run the following bash script using RunCommand or login to an instance from your autoscaling group to run it (doesn’t matter which one). The instance where the bash script is executed will be the master node of our cluster.
We use an elastic IP provided by AWS for the node that will be the master node, so change variable eip according to your Allocation ID (see Elastic IP Addresses).
We also use Elastic File System of AWS (shared file storage, see Amazon Elastic File System), which multiple Amazon EC2 instances running in multiple Availability Zones (AZs) within the same region can access it. Change variable efs_dns according to your DNS name.
Note
Modify variables user, eip, name_instance, efs_dns, queue_name and slots with your own configuration. Elastic IP and EFS are not mandatory. You can use a NFS server instead of EFS, for example. In this example the instances have two cores each of them.
#!/bin/bash
##variables
user=ubuntu
source /home/$user/.profile
eip=<Allocation ID of Elastic IP>
name_instance=conabio-dask-sge-master
efs_dns=<DNS name of EFS>
##Name of the queue that will be used by dask-scheduler and dask-workers
queue_name=dask-queue.q
##Change number of slots to use for every instance, in this example the instances have 2 slots each of them
slots=2
region=$region
type_value=$type_value
##Mount shared volume
mount -t nfs4 -o nfsvers=4.1,rsize=1048576,wsize=1048576,hard,timeo=600,retrans=2 $efs_dns:/ $mount_point
mkdir -p $mount_point/datacube/datacube_ingest
##Tag instance
INSTANCE_ID=$(curl -s http://instance-data/latest/meta-data/instance-id)
PUBLIC_IP=$(curl -s http://instance-data/latest/meta-data/public-ipv4)
##Assining elastic IP where this bash script is executed
aws ec2 associate-address --instance-id $INSTANCE_ID --allocation-id $eip --region $region
##Tag instance where this bash script is executed
aws ec2 create-tags --resources $INSTANCE_ID --tag Key=Name,Value=$name_instance-$PUBLIC_IP --region=$region
##Execute bash script create-dask-sge-queue already created on Dependencies-Cloud Deployment
bash $mount_point/create-dask-sge-queue.sh $queue_name $slots
3.2 Restart gridengine-exec on nodes and install Open DataCube and Antares3
Use RunCommand service of AWS to execute following bash script in all instances with Key Type, Value Node-dask-sge already configured in step 2, or use a tool for cluster management like clusterssh . (You can also have the line that install OpenDataCube and Antares3 on the bash script configured in step 2 in instances of AutoScalingGroup)
#!/bin/bash
user=ubuntu
source /home/$user/.profile
efs_dns=<DNS name of EFS>
mount -t nfs4 -o nfsvers=4.1,rsize=1048576,wsize=1048576,hard,timeo=600,retrans=2 $efs_dns:/ $mount_point
##Ip for sun grid engine master
master_dns=$(cat $mount_point/ip_master.txt)
echo $master_dns > /var/lib/gridengine/default/common/act_qmaster
/etc/init.d/gridengine-exec restart
##Install antares3
su $user -c "pip3 install --user git+https://github.com/CONABIO/antares3.git@develop"
echo "export PATH=$PATH:/home/$user/.local/bin/" >> ~/.profile
##Create symbolic link to configuration files for antares3
ln -sf $mount_point/.antares /home/$user/.antares
##Create symbolic link to configuration files for datacube in all instances
ln -sf $mount_point/.datacube.conf /home/$user/.datacube.conf
##Uncomment next line if you want to init antares (previously installed)
#su $user -c "/home/$user/.local/bin/antares init"
3.3 Run SGE commands to init cluster
Login to master node and execute:
# Start dask-scheduler on master node. The file scheduler.json will be created on $mount_point (shared_volume) of EFS
$qsub -b y -l h=$HOSTNAME dask-scheduler --scheduler-file $mount_point/scheduler.json
The master node has two cores, one is used for dask-scheduler, the other core can be used as a dask-worker:
$qsub -b y -l h=$HOSTNAME dask-worker --nthreads 1 --scheduler-file $mount_point/scheduler.json
If your group of autoscaling has 3 nodes, then execute:
# Start 6 (=3 nodes x 2 cores each node) dask-worker processes in an array job pointing to the same file
$qsub -b y -t 1-6 dask-worker --nthreads 1 --scheduler-file $mount_point/scheduler.json
You can view the web SGE on the page:
<public DNS of master>/qstat/qstat.cgi
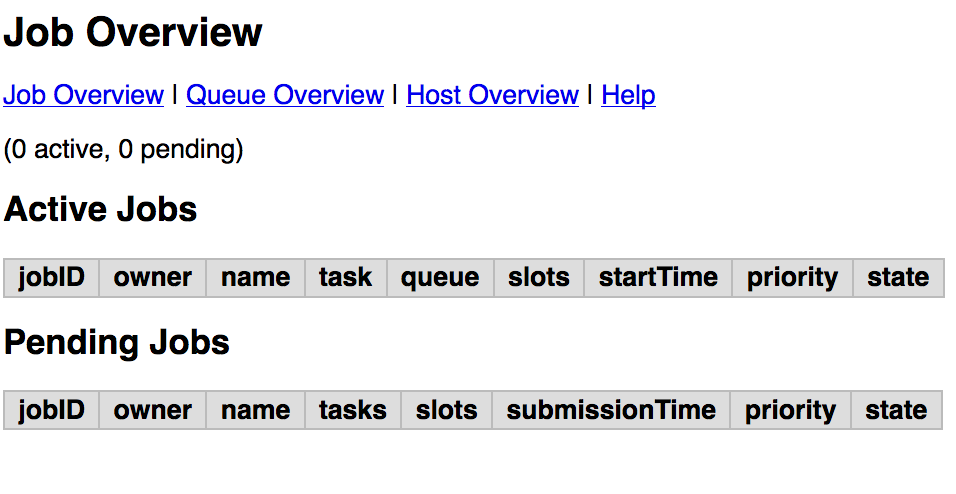
<public DNS of master>/qstat/queue.cgi
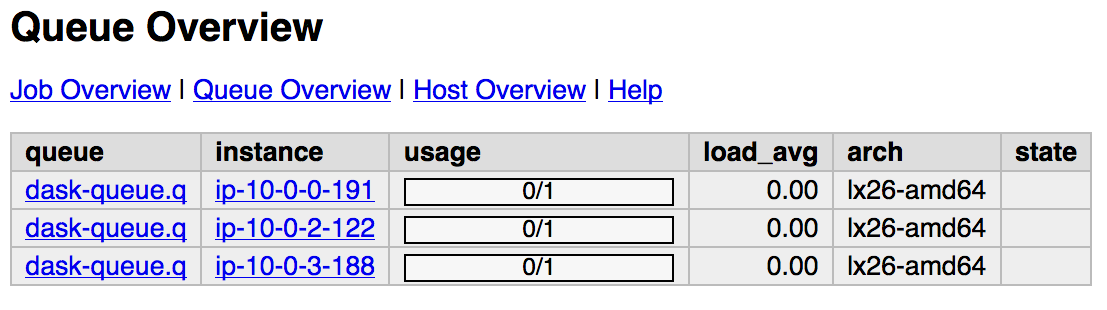
<public DNS of master>/qstat/qstat.cgi

and the state of your cluster with bokeh at:
<public DNS of master>:8787
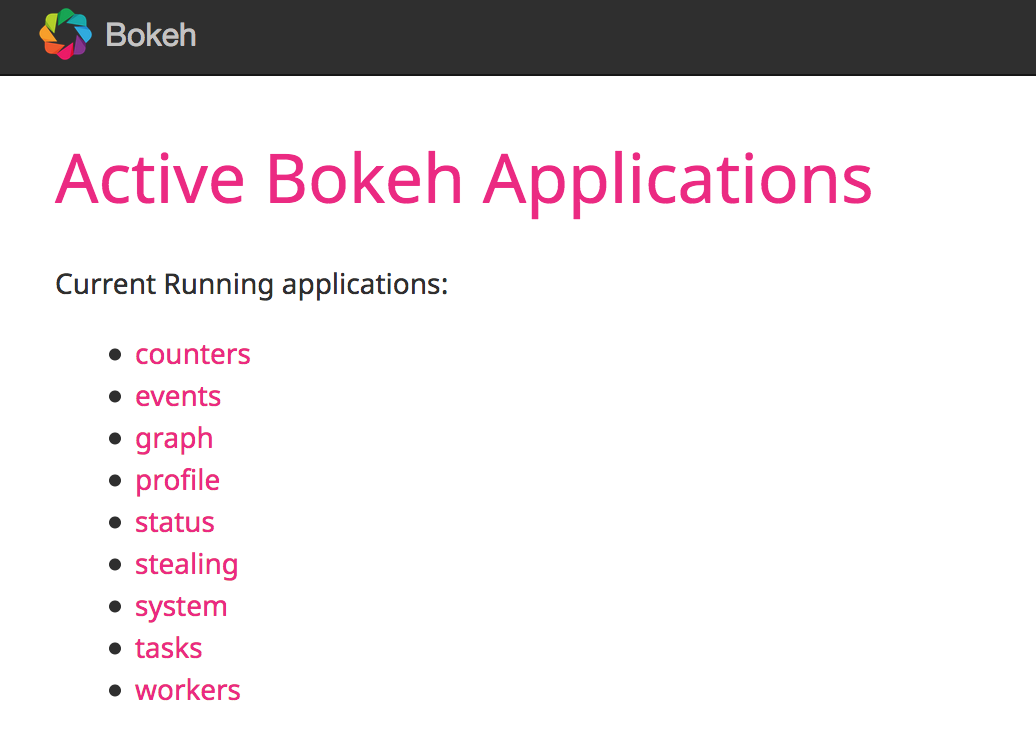
<public DNS of master>:8787/workers
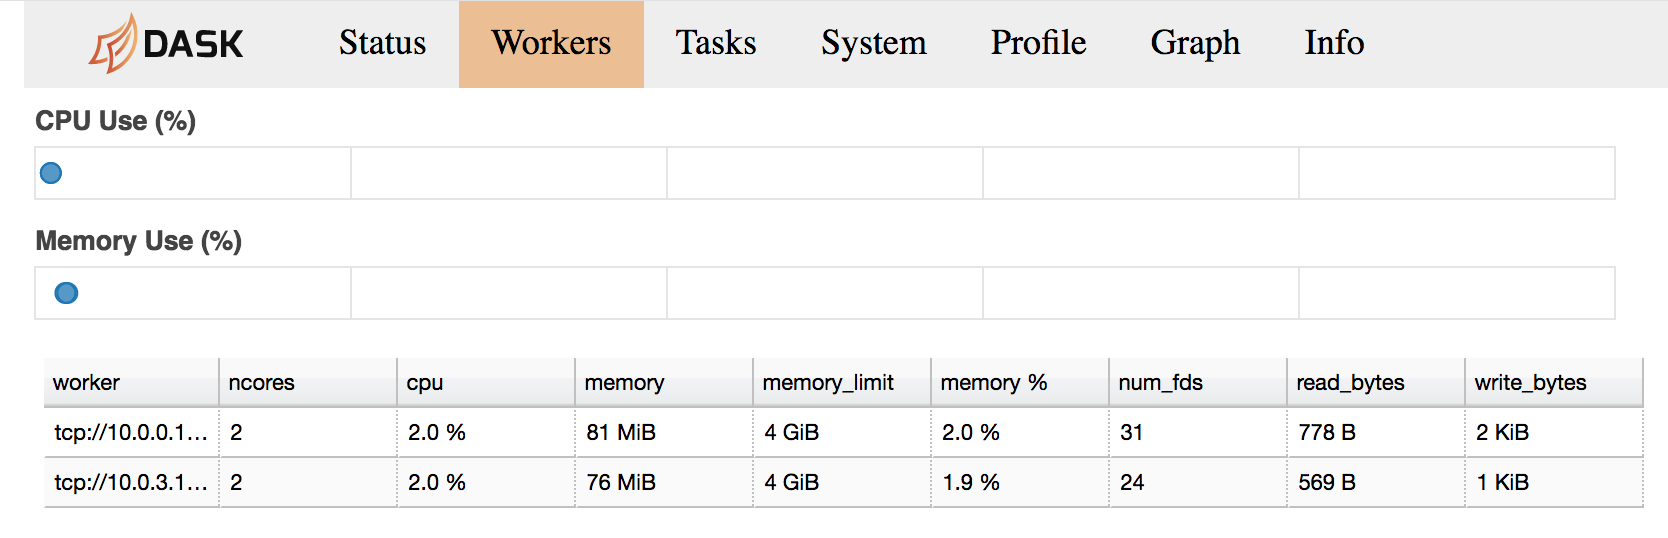
or
<public DNS of worker>:8789

Run an example
On master or node execute:
from dask.distributed import Client
import os
client = Client(scheduler_file=os.environ['mount_point']+'/scheduler.json')

def square(x):
    return x ** 2

def neg(x):
    return -x

A = client.map(square, range(10))
B = client.map(neg, A)
total = client.submit(sum, B)
total.result()
-285
total
<Future: status: finished, type: int, key: sum-ccdc2c162ed26e26fc2dc2f47e0aa479>
client.gather(A)
[0, 1, 4, 9, 16, 25, 36, 49, 64, 81]
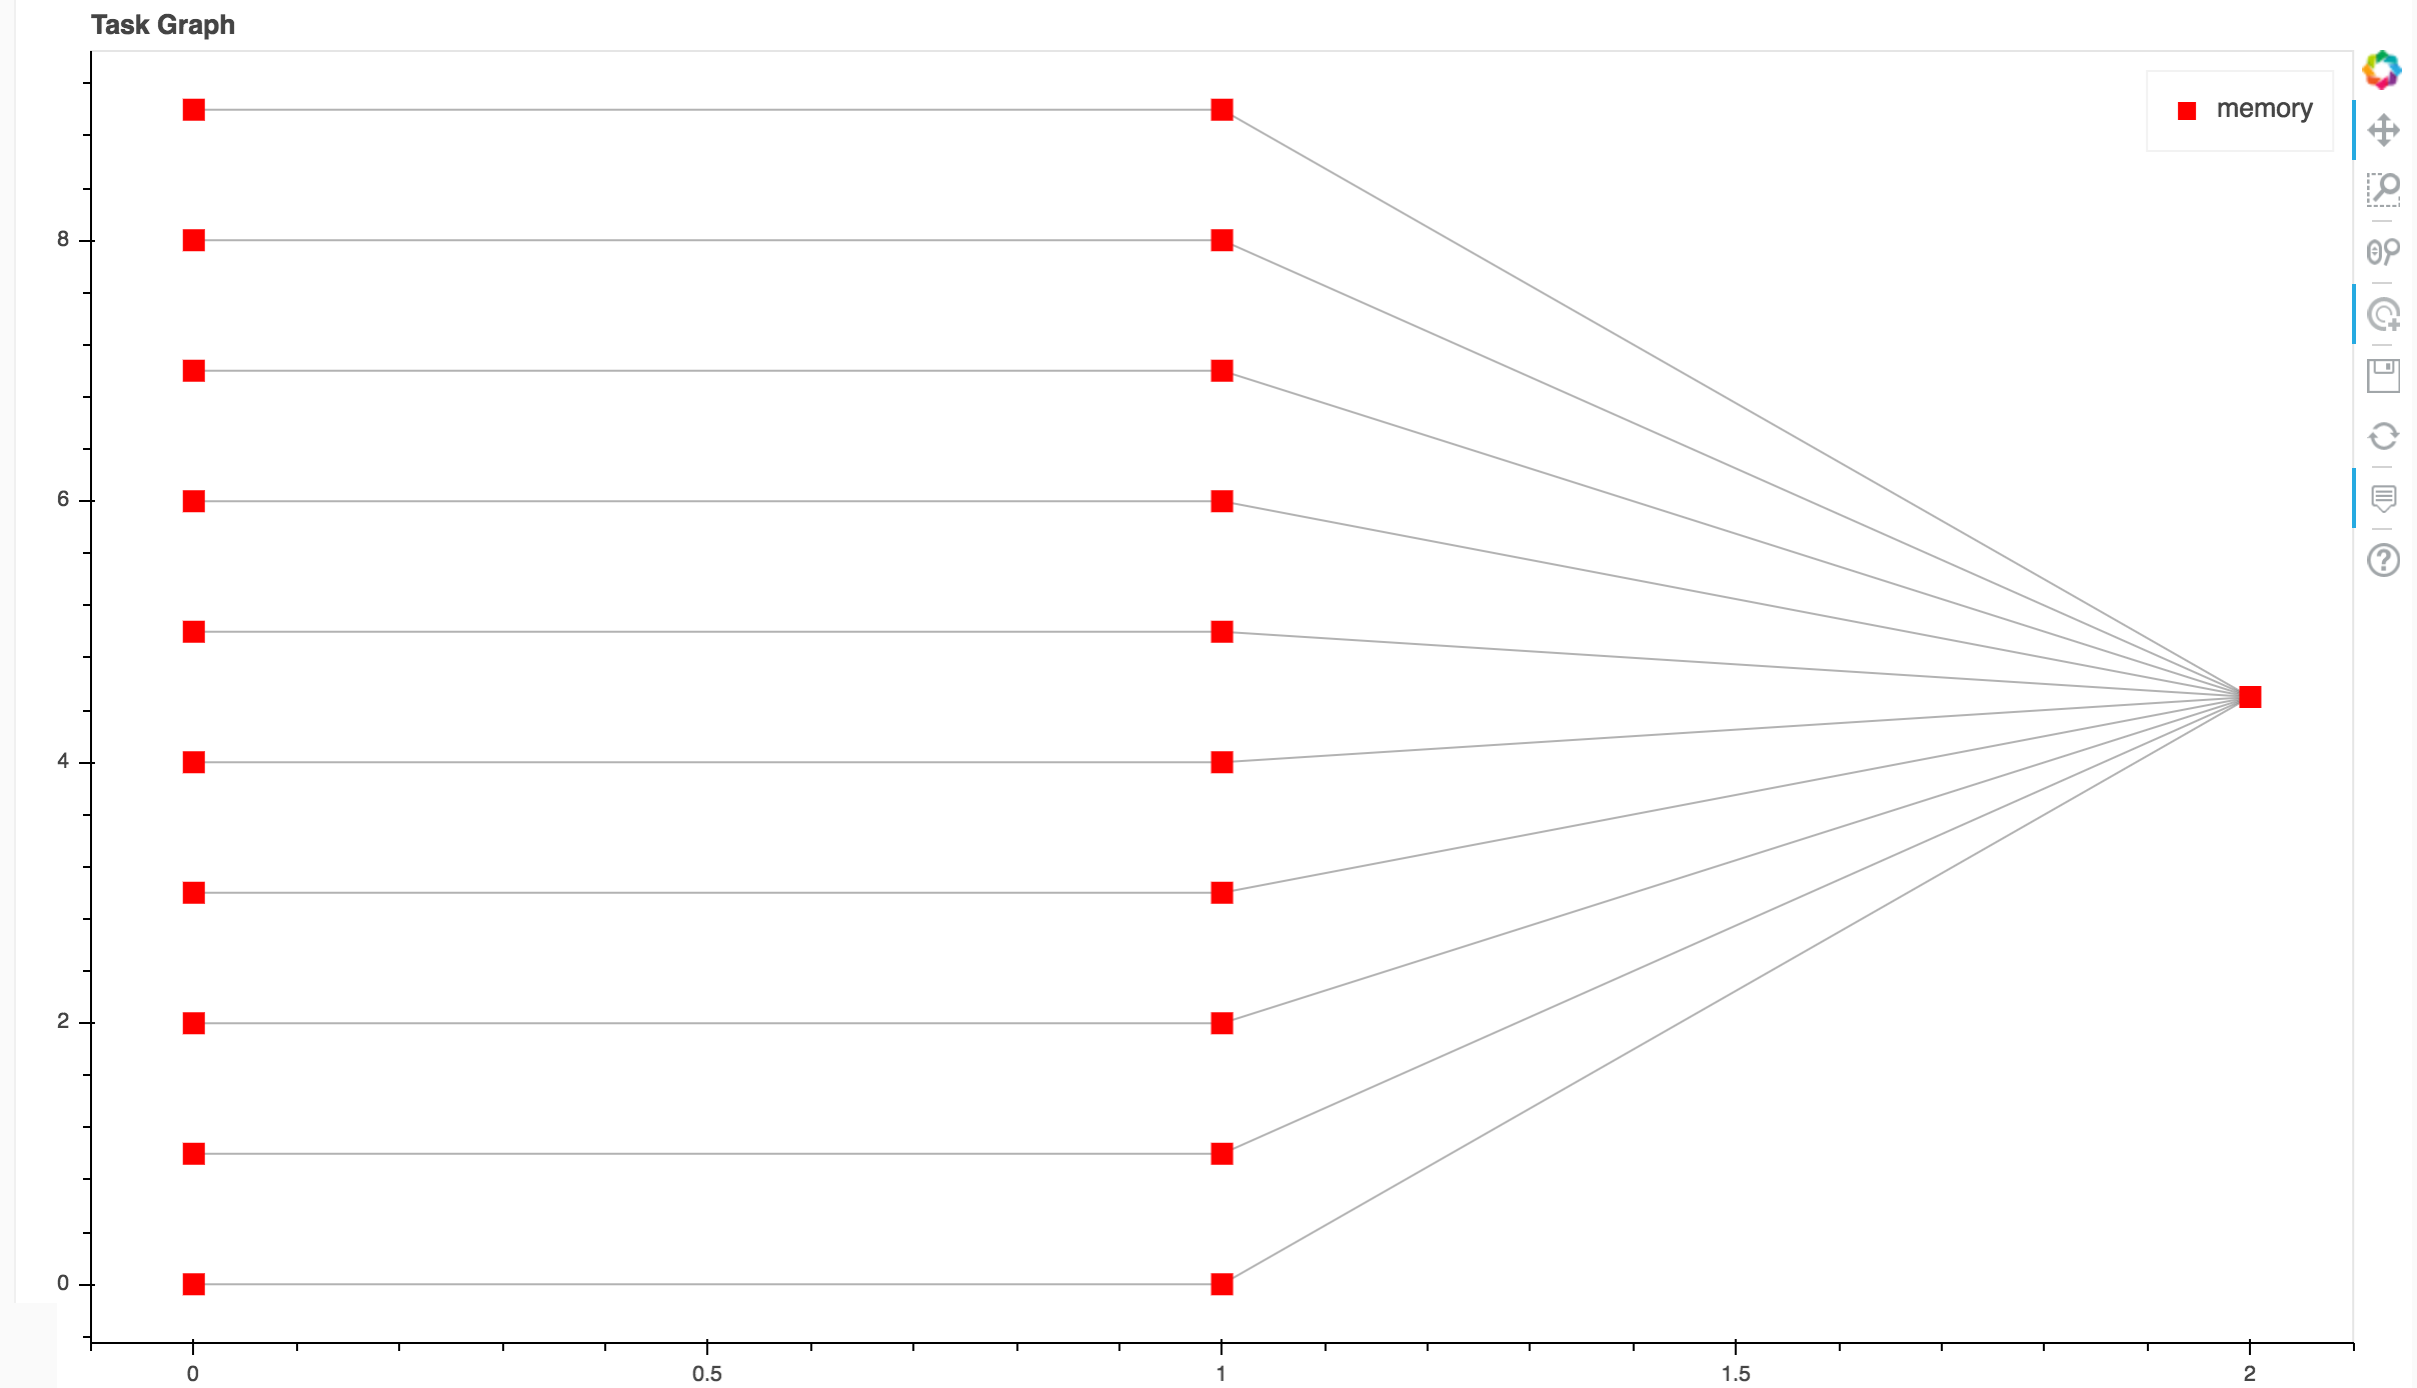
from <public DNS of master>:8787/graph we have:
Note
To stop cluster on master or node execute:
qdel 1 2
4. Create RDS instance
Both Antares3 and Open DataCube use PostgreSQL with PostGis extension. Go to Prerequisites at the top of this page to setup a RDS-instance with subnet and security groups of your preference. Then create a database that will be used for Antares3 and ODC. You can create the database by ssh to an instance of the dask-sge cluster, install postgresql-client and execute a createdb command.
Note
Make sure in the security group for the instance of RDS you have inbound rules of ALL TCP, ALL ICMP-IPv4, PostgreSQL for security group configured for instances.
5. Init Antares and Open DataCube
In step 1 it was configured variable mount_point which is a path to a shared volume.
Open DataCube
Log in to an instance of Auto Scaling Groups configured in step 2 and create in $mount_point/.datacube.conf the datacube configuration file:
[user]
default_environment: <datacube or s3aio_env, first for netcdf and second for s3>

[datacube]
db_hostname: <database_host>
db_database: <database_name>
db_username: <database_user>
db_password: <database_password>

execution_engine.use_s3: <True or False>

[s3aio_env]
db_hostname: <database_host>
db_database: <database_name>
db_username: <database_user>
db_password: <database_password>
index_driver: <default or s3aio_index>, first for netcdf and second for s3>

execution_engine.use_s3: <True or False>
and execute:
Attention
Open Datacube supports NETCDF CF and S3 drivers for storage (see Open DataCube Ingestion Config). Different software dependencies are required for different drivers and different datacube system init command.
$datacube -v system init --no-init-users
Note
The --no-init-users flag is necessary for both drivers so we don’t have errors related to permissions. See this question in StackOverFlow .
For both drivers you can execute the following to check that Open DataCube is properly setup:
$datacube system check
Note
For S3 driver additionally you can check the following tables are created in your database:
\dt agdc.*

s3_dataset
s3_dataset_chunk
s3_dataset_mapping
Antares3
Antares setup consists of setting up the database schemas, ingesting country borders in a table and deploy the configuration files specific to each dataset.
Log in to master node and create in $mount_point/.antares the configuration file for antares:
# Django settings
SECRET_KEY=
DEBUG=True
DJANGO_LOG_LEVEL=DEBUG
ALLOWED_HOSTS=
# Database
DATABASE_NAME=
DATABASE_USER=
DATABASE_PASSWORD=
DATABASE_HOST=
DATABASE_PORT=
# Datacube
SERIALIZED_OBJECTS_DIR=
INGESTION_PATH=
DRIVER=<s3aio or 'NETCDF CF'>
INGESTION_BUCKET=<name of s3 bucket>
# Query and download
USGS_USER=
USGS_PASSWORD=
SCIHUB_USER=
SCIHUB_PASSWORD=
# Misc
BIS_LICENSE=
TEMP_DIR=
and execute:
$antares init -c mex
Use RunCommand service of AWS to execute following bash script in all instances with Key Type, Value Node-dask-sge configured in step 2, or use a tool for cluster management like clusterssh . Modify variable user according to your user.
#!/bin/bash

user=ubuntu

$source /home/$user/.profile

$su $user -c "antares init"
This will create a madmex directory under ~/.config/ where ingestion files for all different suported dataset will be stored.
Kubernetes and Dask
Kubernetes is an open-source system for automating deployment, scaling, and management of containerized applications (see Kubernetes and Kubernetes github page ). There are a lot of ways to deploy a Kubernetes cluster, for instance see Picking the right solution.
Cluster creation
The nex steps follow kops and kops - Kubernetes Operations guides (another guide: Step Zero Kubernetes on AWS).
Configure a domain and a subdomain with their respective hosted zones. For the following description Route 53 service of AWS was used to create domain
conabio-route53.netand subdomainantares3.conabio-route53.net. Also a gossip based Kubernetes cluster can be used instead (see for example this issue and this entry of blog).Install same versions of kops and kubectl. We use a
t2.microinstance with AMIUbuntu 16.04 LTSand a role attached to it to install this tools with the next bash script:
#!/bin/bash
##variables:
region=<region>
name_instance=conabio-kubernetes
shared_volume=/shared_volume
user=ubuntu
##System update
apt-get update
##Install awscli
apt-get install -y python3-pip && pip3 install --upgrade pip==9.0.3
pip3 install awscli --upgrade
##Tag instance
INSTANCE_ID=$(curl -s http://instance-data/latest/meta-data/instance-id)
PUBLIC_IP=$(curl -s http://instance-data/latest/meta-data/public-ipv4)
aws ec2 create-tags --resources $INSTANCE_ID --tag Key=Name,Value=$name_instance-$PUBLIC_IP --region=$region
##Set variables for completion of bash commands
echo "export LC_ALL=C.UTF-8" >> /home/$user/.profile
echo "export LANG=C.UTF-8" >> /home/$user/.profile
##Set variable mount_point
echo "export mount_point=$shared_volume" >> /home/$user/.profile
##Useful software for common operations
apt-get install -y nfs-common jq git htop nano
##Create shared volume
mkdir $shared_volume
##install docker for ubuntu:
apt-get install -y apt-transport-https ca-certificates curl software-properties-common
curl -fsSL https://download.docker.com/linux/ubuntu/gpg | sudo apt-key add -
add-apt-repository "deb [arch=amd64] https://download.docker.com/linux/ubuntu $(lsb_release -cs) stable"
apt-get update
apt-get install -y docker-ce
service docker start
##install kops version 1.9.0:
wget -O kops https://github.com/kubernetes/kops/releases/download/1.9.0/kops-linux-amd64
chmod +x ./kops
sudo mv ./kops /usr/local/bin/
##install kubernetes command line tool v1.9: kubectl
wget -O kubectl https://storage.googleapis.com/kubernetes-release/release/v1.9.0/bin/linux/amd64/kubectl
chmod +x ./kubectl
sudo mv ./kubectl /usr/local/bin/kubectl
##enable completion for kubectl:
echo "source <(kubectl completion bash)" >> /home/$user/.bashrc
You can check kops and kubectl versions with:
$kops version

$kubectl version
Note
All kubectl and kops commands must be executed in this instance.
Set next bash variables:
#Your domain name that is hosted in AWS Route 53
#Use: export DOMAIN_NAME="antares3.k8s.local" #for a gossip based cluster
export DOMAIN_NAME="antares3.conabio-route53.net"

# Friendly name to use as an alias for your cluster
export CLUSTER_ALIAS="k8s-deployment"

# Leave as-is: Full DNS name of you cluster
export CLUSTER_FULL_NAME="${CLUSTER_ALIAS}.${DOMAIN_NAME}"

# AWS availability zone where the cluster will be created

REGION=$(curl -s http://instance-data/latest/dynamic/instance-identity/document|grep region|awk -F\" '{print $4}')

export CLUSTER_AWS_AZ=$(aws ec2 describe-availability-zones --region $REGION | grep ZoneName | awk '{print $2}'|tr -s '\n' ','|tr -d '"'|sed -n 's/,$//p')


# Leave as-is: AWS Route 53 hosted zone ID for your domain (don't set it if gossip based cluster is used)
export DOMAIN_NAME_ZONE_ID=$(aws route53 list-hosted-zones \
       | jq -r '.HostedZones[] | select(.Name=="'${DOMAIN_NAME}'.") | .Id' \
       | sed 's/\/hostedzone\///')

export KUBERNETES_VERSION="1.9.0"

#To hold cluster state information export KOPS_STATE_STORE
export KOPS_STATE_STORE="s3://${CLUSTER_FULL_NAME}-state"

export EDITOR=nano
Create AWS S3 bucket to hold information for Kubernetes cluster:
Note
The instance needs the policy AmazonS3FullAccess attach to a role created by you to have permissions to execute next command.
#Bucket will be created in us-east (N. Virginia)
$aws s3api create-bucket --bucket ${CLUSTER_FULL_NAME}-state
Create group and user kops and generate access keys for user kops:
Note
The instance needs the policy IAMFullAccess attach to a role created by you to have permissions to execute next command.
Create group and permissions of it:
$aws iam create-group --group-name kops

$aws iam attach-group-policy --policy-arn arn:aws:iam::aws:policy/AmazonEC2FullAccess --group-name kops

$aws iam attach-group-policy --policy-arn arn:aws:iam::aws:policy/AmazonRoute53FullAccess --group-name kops

$aws iam attach-group-policy --policy-arn arn:aws:iam::aws:policy/AmazonS3FullAccess --group-name kops

$aws iam attach-group-policy --policy-arn arn:aws:iam::aws:policy/IAMFullAccess --group-name kops

$aws iam attach-group-policy --policy-arn arn:aws:iam::aws:policy/AmazonVPCFullAccess --group-name kops

$aws iam attach-group-policy --policy-arn arn:aws:iam::aws:policy/AmazonElasticFileSystemFullAccess --group-name kops
Create user kops and add it to already created group kops:
$aws iam create-user --user-name kops

$aws iam add-user-to-group --user-name kops --group-name kops
Create access keys for user kops:
$aws iam create-access-key --user-name kops
This will generate an AccessKeyId and SecretAccessKey that must be kept in a safe place. Use them to configure awscli and set next variables:
$aws configure
        AWS Access Key ID [None]: xxxx
        AWS Secret Access Key [None]: xxxxxxx
        Default region name [None]: <leave it empty>
        Default output format [None]: <leave it empty>

$export AWS_ACCESS_KEY_ID=$(aws configure get aws_access_key_id)

$export AWS_SECRET_ACCESS_KEY=$(aws configure get aws_secret_access_key)
Create a Key Pair with AWS console and a Public Key. See Amazon EC2 Key Pairs sections: Creating a Key Pair Using Amazon EC2 and Creating a Key Pair Using Amazon EC2. Save the Public Key in
/home/ubuntu/.ssh/id_rsa.pub.Deploy Kubernetes Cluster. An example is:
$kops create cluster \
--name=${CLUSTER_FULL_NAME} \
--zones=${CLUSTER_AWS_AZ} \
--master-size="t2.medium" \
--node-size="t2.medium" \
--node-count="3" \
--dns-zone=${DOMAIN_NAME} \
--ssh-public-key="/home/ubuntu/.ssh/id_rsa.pub" \
--kubernetes-version=${KUBERNETES_VERSION} --yes
Note
Check status of cluster with kops validate cluster and wait until it says Your cluster $CLUSTER_FULL_NAME is ready
Note
You can delete cluster with: $kops delete cluster ${CLUSTER_FULL_NAME} and then $kops delete cluster ${CLUSTER_FULL_NAME} --yes (without yes flag you only see what changes are going to be applied) and don’t forget to delete S3 bucket: $aws s3api delete-bucket --bucket ${CLUSTER_FULL_NAME}-state after cluster deletion.
Note
You can scale up/down nodes of cluster with command: $kops edit ig nodes --name $CLUSTER_FULL_NAME, edit screen that appears and set 3/0 number of instances in minSize, maxSize values (3 is an example) and then $kops update cluster $CLUSTER_FULL_NAME and $kops update cluster $CLUSTER_FULL_NAME --yes to apply changes. Command kops validate cluster is useful to see state of cluster.
Note
To scale up/down master you can use: $kops edit ig master-us-west-2a --name $CLUSTER_FULL_NAME (you can check your instance type of master with: $kops get instancegroups) set 1/0 number of instances in minSize, maxSize values and then $kops update cluster $CLUSTER_FULL_NAME and $kops update cluster $CLUSTER_FULL_NAME --yes to apply changes. Command kops validate cluster is useful to see state of cluster.
¿How do I ssh to an instance of Kubernetes Cluster?
Using the key-pem already created for the kops user and execute:
$ssh -i <key>.pem admin@api.$CLUSTER_FULL_NAME
Note
Make sure this <key>.pem has 400 permissions: $chmod 400 <key>.pem.
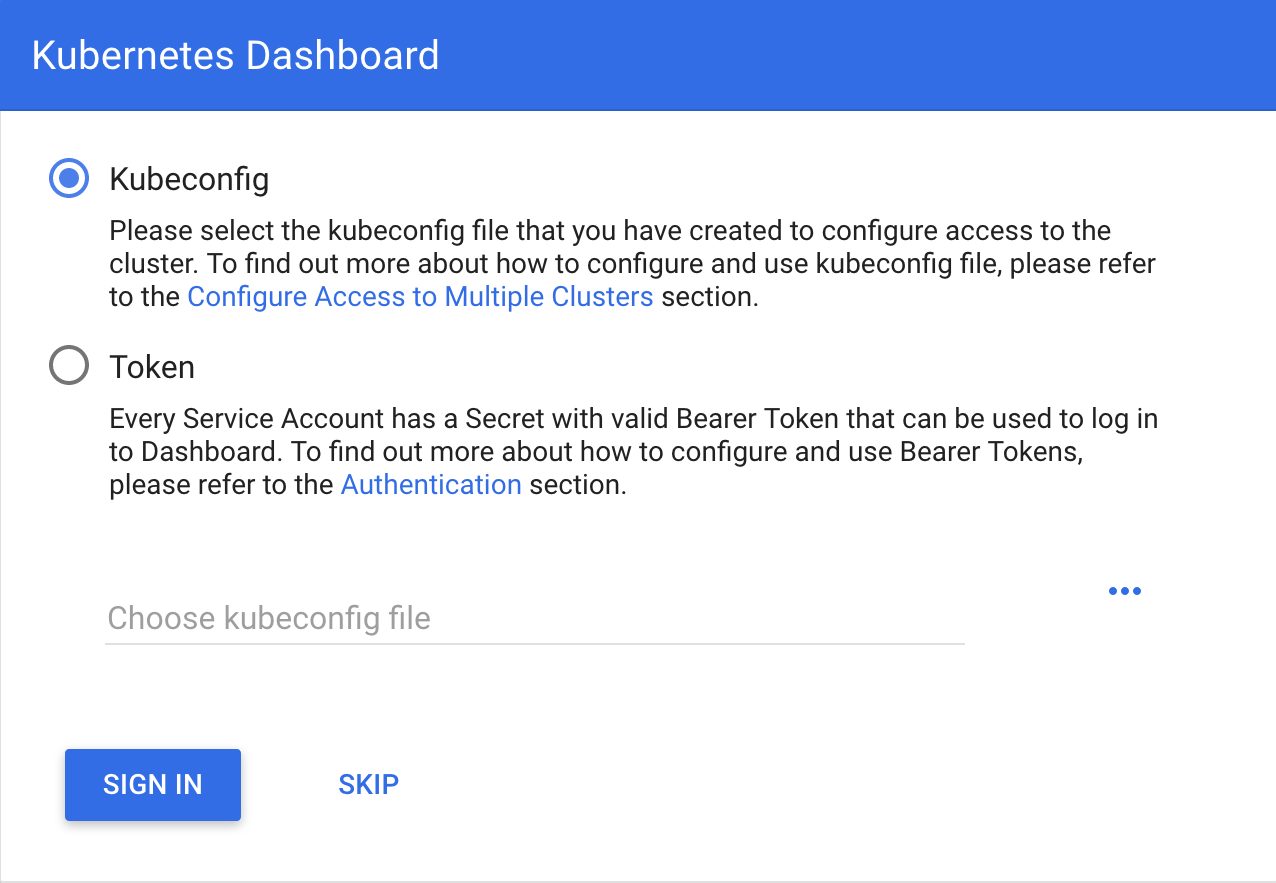
You can also deploy kubernetes dashboard for your cluster.
Kubernetes dashboard
According to Kubernetes Dashboard kubernetes dashboard is a general purpose, web-based UI for kubernetes clusters. It allows users to manage applications running in the cluster and troubleshoot them, as well as manage the cluster itself.
Next steps are based on: Certificate management, Installation, Accessing Dashboard 1.7.X and above and Creating sample user from kubernetes official documentation and installation of Certbot for Ubuntu (16.04) xenial and certbot-dns-route53 to generate certificates and access kubernetes dashboard via https.
Install certbot and Route53 plugin for Let’s Encrypt client:
#Install certbot for ubuntu (16.04) xenial
$sudo apt-get update
$sudo apt-get install -y software-properties-common
$sudo add-apt-repository ppa:certbot/certbot
$sudo apt-get update
$sudo apt-get install -y certbot
#check version of certbot and install route53 plugin:
certbot_v=$(certbot --version|cut -d' ' -f2)
$sudo pip3 install certbot_dns_route53==$certbot_v
Create some useful directories:
$mkdir -p ~/letsencrypt/log/
$mkdir -p ~/letsencrypt/config/
$mkdir -p ~/letsencrypt/work/
Using kubectl retrieve where is kubernetes master running:
$ kubectl cluster-info
Kubernetes master is running at <location>
KubeDNS is running at <location>/api/v1/namespaces/kube-system/services/kube-dns:dns/proxy

To further debug and diagnose cluster problems, use 'kubectl cluster-info dump'.
Generate certificate for the <location> (remove https if it’s the case, just the dns name) of last command (make sure to save directory letsencrypt in a safe place):
$certbot certonly -d <location> --dns-route53 --logs-dir letsencrypt/log/ --config-dir letsencrypt/config/ --work-dir letsencrypt/work/ -m myemail@myinstitution --agree-tos --non-interactive --dns-route53-propagation-seconds 20
Note
Make sure you save the date that will expire your certificate. To renew certificate execute:
$certbot renew --dns-route53 --logs-dir letsencrypt/log/ \
 --config-dir letsencrypt/config/ --work-dir letsencrypt/work/ \
 --non-interactive
Note
Also you need to have some symlinks created under directory: `letsencrypt/config/live/<location>`:
cert.pem -> ../../archive/<location>/cert1.pem
chain.pem -> ../../archive/<location>/chain1.pem
fullchain.pem -> ../../archive/<location>/fullchain1.pem
privkey.pem -> ../../archive/<location>/privkey1.pem
Create directory certs and copy cert and private key:
$mkdir certs
$cp letsencrypt/config/archive/<location>/fullchain1.pem certs/
$cp letsencrypt/config/archive/<location>/privkey1.pem certs/
Note
When renewing your certificate the latest ones will be symlinks located: letsencrypt/config/live/<location>/. See Where are my certificates?
To compute resource usage analysis and monitoring of container clusters heapster is used (although by this time july 2018 is recommended to migrate to metrics-server and a third party metrics pipeline to gather Prometheus-format metrics instead.)
$git clone https://github.com/kubernetes/heapster.git
#We are using some hardcoded version from which we know there will be sucessfull deployment of dashboard
$sed -ni 's/heapster-grafana-.*/heapster-grafana-amd64:v4.4.3/;p' heapster/deploy/kube-config/influxdb/grafana.yaml
$sed -ni 's/heapster-influxdb-.*/heapster-influxdb-amd64:v1.3.3/;p' heapster/deploy/kube-config/influxdb/influxdb.yaml
$sed -ni 's/heapster-.*/heapster-amd64:v1.3.0/;p' heapster/deploy/kube-config/influxdb/heapster.yaml
Next steps are based on: Run Heapster in a Kubernetes cluster with an InfluxDB backend and a Grafana UI
$kubectl create -f heapster/deploy/kube-config/influxdb/
$kubectl create -f heapster/deploy/kube-config/rbac/heapster-rbac.yaml
Establish certs that will be used by kubernetes dashboard in kubernetes-dashboard.yaml:
$curl -O https://raw.githubusercontent.com/kubernetes/dashboard/master/src/deploy/recommended/kubernetes-dashboard.yaml
$sed -ni 's/- --auto-generate-certificates/#- --auto-generate-certificates/;p' kubernetes-dashboard.yaml
$sed -i '/args:/a \ \ \ \ \ \ \ \ \ \ - --tls-cert-file=fullchain1.pem' kubernetes-dashboard.yaml
$sed -i '/args:/a \ \ \ \ \ \ \ \ \ \ - --tls-key-file=privkey1.pem' kubernetes-dashboard.yaml
Create kubernetes secret:
$kubectl create secret generic kubernetes-dashboard-certs --from-file=certs -n kube-system
Apply changes kubernetes-dashboard.yaml :
$kubectl apply -f kubernetes-dashboard.yaml
You can check that containers are running by executing:
$kubectl -n kube-system get pods
To visualize kubernetes-dashboard one possibility is to change type ClusterIP to NodePort (see Accessing Dashboard 1.7.X and above) when executing next command:
$kubectl edit service kubernetes-dashboard -n kube-system
and get port with:
$kubectl get service kubernetes-dashboard -n kube-system
Open port retrieved by last command in masters security group of kubernetes cluster. In your browser type:
https://<location>:<port>
Documentation of Creating sample user can be used to access via token generation. Use:
kubectl -n kube-system describe secret $(kubectl -n kube-system get secret | grep admin-user | awk '{print $1}')
to retrieve token.
To scale down components of kubernetes dashboard:
$kubectl -n kube-system scale deployments/kubernetes-dashboard --replicas=0
$kubectl -n kube-system scale deployments/monitoring-grafana --replicas=0
$kubectl -n kube-system scale deployments/heapster --replicas=0
$kubectl -n kube-system scale deployments/monitoring-influxdb --replicas=0
To scale up components of kubernetes dashboard:
$kubectl -n kube-system scale deployments/monitoring-grafana --replicas=1
$kubectl -n kube-system scale deployments/heapster --replicas=1
$kubectl -n kube-system scale deployments/monitoring-influxdb --replicas=1
$kubectl -n kube-system scale deployments/kubernetes-dashboard --replicas=1
To delete components of kubernetes dashboard:
#delete admin-user created:

$kubectl -n kube-system delete serviceaccount admin-user
$kubectl -n kube-system delete ClusterRoleBinding admin-user

#delete dashboard components:
$kubectl -n kube-system delete deploy/kubernetes-dashboard
$kubectl -n kube-system delete svc/kubernetes-dashboard
$kubectl -n kube-system delete rolebinding kubernetes-dashboard-minimal
$kubectl -n kube-system delete role kubernetes-dashboard-minimal
$kubectl -n kube-system delete serviceaccount kubernetes-dashboard
$kubectl -n kube-system delete secret kubernetes-dashboard-certs kubernetes-dashboard-key-holder

#delete heapster components:
$kubectl -n kube-system delete deploy/heapster
$kubectl -n kube-system delete deploy/monitoring-grafana deploy/monitoring-influxdb
$kubectl -n kube-system delete svc/heapster svc/monitoring-grafana svc/monitoring-influxdb
$kubectl -n kube-system delete serviceaccount heapster
$kubectl -n kube-system delete clusterrolebinding heapster
Deployment for Elastic File System
In order to share some files (for example .antares and .datacube.conf) between all containers efs-provisioner is used. See efs-provisioner.
Retrieve id’s of subnets and security groups created by kops. Here it’s assumed that three subnets were created by kops create cluster command:
REGION=$(curl -s http://instance-data/latest/dynamic/instance-identity/document|grep region|awk -F\" '{print $4}')

export AWS_DEFAULT_REGION=$REGION

subnets_kops=$(aws ec2 describe-subnets --filters "Name=tag:KubernetesCluster,Values=$CLUSTER_FULL_NAME"|jq -r '.Subnets[].SubnetId'|tr -s '\n' ' ')

subnets_kops1=$(echo $subnets_kops|cut -d' ' -f1)

subnets_kops2=$(echo $subnets_kops|cut -d' ' -f2)

subnets_kops3=$(echo $subnets_kops|cut -d' ' -f3)

sgroups_kops=$(aws ec2 describe-security-groups --filters "Name=tag:KubernetesCluster,Values=$CLUSTER_FULL_NAME"|jq -r '.SecurityGroups[].GroupId'|tr -s '\n' ' ')

sgroups_master=$(aws ec2 describe-security-groups --filters "Name=tag:Name,Values=masters.$CLUSTER_FULL_NAME"|jq -r '.SecurityGroups[].GroupId'|tr -s '\n' ' ')

sgroups_nodes=$(aws ec2 describe-security-groups --filters "Name=tag:Name,Values=nodes.$CLUSTER_FULL_NAME"|jq -r '.SecurityGroups[].GroupId'|tr -s '\n' ' ')
Use next commands to create EFS:
#create EFS (must be defined environment variable $AWS_DEFAULT_REGION:
$aws efs create-file-system --performance-mode maxIO --creation-token <some random integer number>
Set DNS and id of EFS, give access to docker containers to EFS via mount targets and security groups:
#last create-file-system command should have output next values
efs_dns=<DNS of EFS>

efs_id=<id of EFS>

#must be defined environment variable $AWS_DEFAULT_REGION

#create mount targets for three subnets:
$aws efs create-mount-target --file-system-id $efs_id --subnet-id $subnets_kops1 --security-groups $sgroups_kops

$aws efs create-mount-target --file-system-id $efs_id --subnet-id $subnets_kops2 --security-groups $sgroups_kops

$aws efs create-mount-target --file-system-id $efs_id --subnet-id $subnets_kops3 --security-groups $sgroups_kops

#You have to poll the status of mount targets until status LifeCycleState = “available” so you can use EFS from instances that were created:

#aws efs describe-mount-targets --file-system-id $efs_id

#Create inbound rules for NFS on the security groups:

$aws ec2 authorize-security-group-ingress --group-id $sgroups_master --protocol tcp --port 2049 --source-group $sgroups_master

$aws ec2 authorize-security-group-ingress --group-id $sgroups_nodes --protocol tcp --port 2049 --source-group $sgroups_nodes
Create yaml for deployment
In the next efs-provisioner.yaml put EFS id, region, AccessKeyId and SecretAccessKey already generated for user kops:
---
apiVersion: v1
kind: ConfigMap
metadata:
  name: efs-provisioner
data:
  file.system.id: <efs id> ##### Here put efs id
  aws.region: <region> ##### Here put region,
  provisioner.name: aws-efs
---
kind: ClusterRole
apiVersion: rbac.authorization.k8s.io/v1
metadata:
  name: efs-provisioner-runner
rules:
  - apiGroups: [""]
    resources: ["persistentvolumes"]
    verbs: ["get", "list", "watch", "create", "delete"]
  - apiGroups: [""]
    resources: ["persistentvolumeclaims"]
    verbs: ["get", "list", "watch", "update"]
  - apiGroups: ["storage.k8s.io"]
    resources: ["storageclasses"]
    verbs: ["get", "list", "watch"]
  - apiGroups: [""]
    resources: ["events"]
    verbs: ["list", "watch", "create", "update", "patch"]
  - apiGroups: [""]
    resources: ["endpoints"]
    verbs: ["get", "list", "watch", "create", "update", "patch"]
---
kind: ClusterRoleBinding
apiVersion: rbac.authorization.k8s.io/v1
metadata:
  name: run-efs-provisioner
subjects:
  - kind: ServiceAccount
    name: efs-provisioner
    namespace: default
roleRef:
  kind: ClusterRole
  name: efs-provisioner-runner
  apiGroup: rbac.authorization.k8s.io
---
apiVersion: v1
kind: ServiceAccount
metadata:
  name: efs-provisioner
---
kind: Deployment
apiVersion: extensions/v1beta1
metadata:
  name: efs-provisioner
spec:
  replicas: 1
  strategy:
    type: Recreate
  template:
    metadata:
      labels:
        app: efs-provisioner
    spec:
      serviceAccount: efs-provisioner
      containers:
        - name: efs-provisioner
          image: quay.io/external_storage/efs-provisioner:latest
          env:
            - name: FILE_SYSTEM_ID
              valueFrom:
                configMapKeyRef:
                  name: efs-provisioner
                  key: file.system.id
            - name: AWS_REGION
              valueFrom:
                configMapKeyRef:
                  name: efs-provisioner
                  key: aws.region
            - name: PROVISIONER_NAME
              valueFrom:
                configMapKeyRef:
                  name: efs-provisioner
                  key: provisioner.name
            - name: AWS_ACCESS_KEY_ID
              value: <AccessKeyId of user kops> #####Here put AccessKeyId
            - name: AWS_SECRET_ACCESS_KEY
              value: <SecretAccessKey of user kops> #####Here put SecretAccessKey
          volumeMounts:
            - name: pv-volume
              mountPath: /persistentvolumes
      volumes:
        - name: pv-volume
          nfs:
            server: <efs id>.efs.us-west-2.amazonaws.com #####Here put efs id
            path: /
---
kind: StorageClass
apiVersion: storage.k8s.io/v1beta1
metadata:
  name: aws-efs
provisioner: aws-efs
---
kind: PersistentVolumeClaim
apiVersion: v1
metadata:
  name: efs
  annotations:
    volume.beta.kubernetes.io/storage-class: "aws-efs"
spec:
  accessModes:
    - ReadWriteMany
  resources:
    requests:
      storage: 1Mi
---
Execute next commands to create deployment:
$kubectl create -f efs-provisioner.yaml
Note
PersistentVolumes can have various reclaim policies, including “Retain”, “Recycle”, and “Delete”.For dynamically provisioned PersistentVolumes, the default reclaim policy is “Delete”. This means that a dynamically provisioned volume is automatically deleted when a user deletes the corresponding PersistentVolumeClaim. This automatic behavior might be inappropriate if the volume contains precious data. In that case, it is more appropriate to use the “Retain” policy. With the “Retain” policy, if a user deletes a PersistentVolumeClaim, the corresponding PersistentVolume is not be deleted. Instead, it is moved to the Released phase, where all of its data can be manually recovered. See: Why change reclaim policy of a PersistentVolume
To change reclaim policy, retrieve persistent volume and execute kubectl patch command:
pv_id=$(kubectl get pv|grep pvc | cut -d' ' -f1)

$kubectl patch pv $pv_id -p '{"spec":{"persistentVolumeReclaimPolicy":"Retain"}}'
In order to be able to scale up/down cluster without deleting deployment of efs (and thereby persistentvolume and claim), next command is useful:
$kubectl scale deployments/efs-provisioner --replicas=0 #use replicas=1 when scaling up cluster after a scale down was performed.
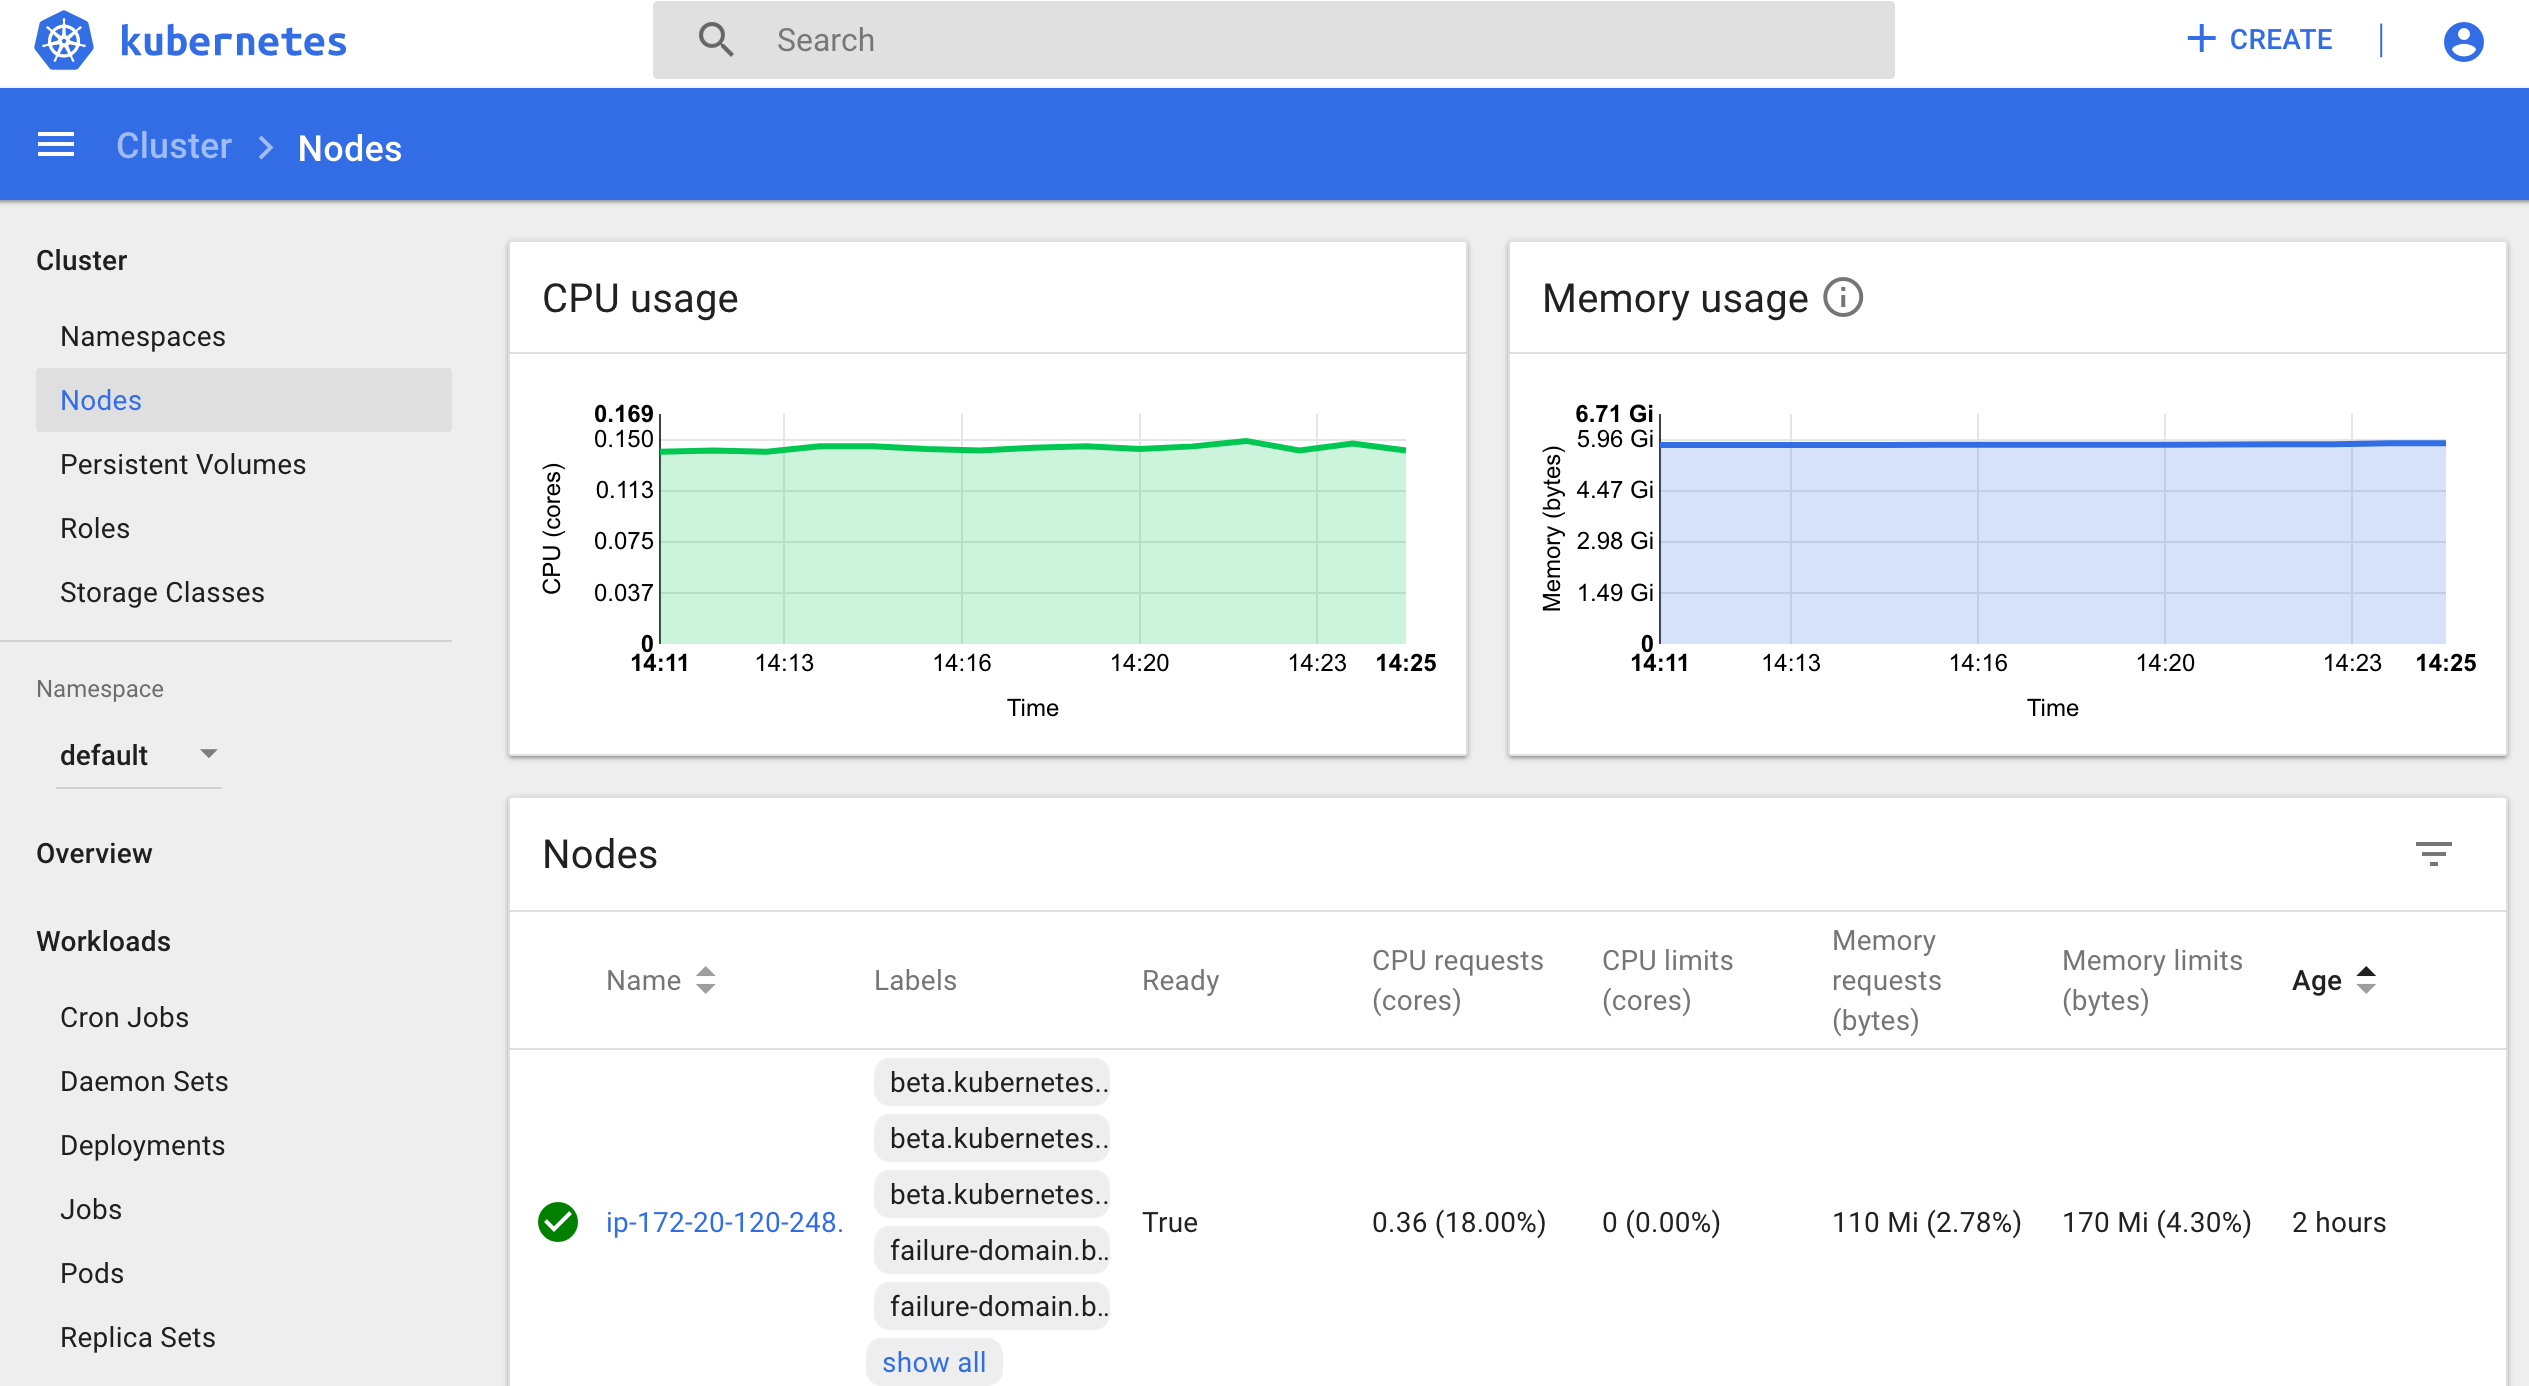
or if you already have created it you can scale this deployment by using kubernetes dashboard:

Create RDS instance
Both Antares3 and Open DataCube use PostgreSQL with PostGis extension. Go to Prerequisites at the top of this page to setup a RDS-instance with subnet and security groups created by kops create cluster command. Then create a database that will be used for Antares3 and ODC. You can create the database by ssh to an instance of Kubernetes cluster, install postgresql-client and execute a createdb command (to ssh to an instance of Kubernetes cluster see end of Cluster Creation section).
Note
Make sure in the security group for the instance of RDS you have inbound rules of ALL TCP, ALL ICMP-IPv4, PostgreSQL for both security groups of master and nodes created by kops create cluster command.
Dockerfile for containers of Antares3 and OpenDataCube
To have an user interface to work with we use JupyterLab which can be used with https to browse jupyter notebook, see Running a notebook server.
Note
Soon we will use JupyterHub to have multiple instances of the single-user Jupyter notebook server, see Step Zero Kubernetes on AWS.
Create a hashed password:
sudo pip3 install jupyterlab

#enter python and then:
from notebook.auth import passwd
passwd()

Enter password:
Verify password:

'sha1:1f925h17t3p1:....' #this will be used to setup https for jupyterlab, save it.
Use next Dockerfile to build docker image for antares3:
FROM ubuntu:xenial
USER root

#see: https://github.com/Yelp/dumb-init/ for next line:
RUN apt-get update && apt-get install -y wget curl && wget -O /usr/local/bin/dumb-init https://github.com/Yelp/dumb-init/releases/download/v$(curl -s https://api.github.com/repos/Yelp/dumb-init/releases/latest| grep tag_name|sed -n 's/  ".*v\(.*\)",/\1/p')/dumb-init_$(curl -s https://api.github.com/repos/Yelp/dumb-init/releases/latest| grep tag_name|sed -n 's/  ".*v\(.*\)",/\1/p')_amd64 && chmod +x /usr/local/bin/dumb-init

#base dependencies
RUN apt-get update && apt-get install -y \
            openssh-server \
            openssl \
            sudo \
            nano \
            software-properties-common \
            python-software-properties \
            git \
            vim \
            vim-gtk \
            htop \
            build-essential \
            libssl-dev \
            libffi-dev \
            cmake \
            python3-dev \
            python3-pip \
            python3-setuptools \
            ca-certificates \
            postgresql-client \
            libudunits2-dev \
            nodejs-legacy && pip3 install --upgrade pip==9.0.3

#Install spatial libraries
RUN add-apt-repository -y ppa:ubuntugis/ubuntugis-unstable && apt-get -qq update
RUN apt-get install -y \
            netcdf-bin \
            libnetcdf-dev \
            ncview \
            libproj-dev \
            libgeos-dev \
            gdal-bin \
            libgdal-dev
#Create directory and copy crt file for rasterio to read raster from S3 bucket

RUN mkdir -p /etc/pki/tls/certs
RUN cp /etc/ssl/certs/ca-certificates.crt /etc/pki/tls/certs/ca-bundle.crt

#Create user: madmex_user
RUN groupadd madmex_user
RUN useradd madmex_user -g madmex_user -m -s /bin/bash
RUN echo "madmex_user ALL=(ALL:ALL) NOPASSWD:ALL" | (EDITOR="tee -a" visudo)
RUN echo "madmex_user:madmex_user" | chpasswd

##Install dask distributed
RUN pip3 install dask distributed --upgrade && pip3 install bokeh
##Install missing package for open datacube:
RUN pip3 install --upgrade python-dateutil

#Dependencies for antares3 & datacube
RUN pip3 install numpy==1.14.0 && pip3 install GDAL==$(gdal-config --version) --global-option=build_ext --global-option='-I/usr/include/gdal' && pip3 install rasterio==1.0.2 --no-binary rasterio
RUN pip3 install scipy cloudpickle sklearn lightgbm fiona django --no-binary fiona
RUN pip3 install --no-cache --no-binary :all: psycopg2
RUN pip3 install futures pathlib setuptools==20.4

#datacube:
RUN apt-get clean && apt-get update && apt-get install -y locales
RUN locale-gen en_US.UTF-8
ENV LANG en_US.UTF-8
ENV LC_ALL en_US.UTF-8
RUN pip3 install git+https://github.com/opendatacube/datacube-core.git@develop#egg=datacube[s3]

#Upgrade awscli and tools for s3:
RUN pip3 install boto3 botocore awscli --upgrade

#install jupyter lab and notebook:
RUN pip3 install jupyter jupyterlab --upgrade

#antares3:
USER madmex_user
RUN pip3 install --user git+https://github.com/CONABIO/antares3.git@develop

#set password for jupyter lab:
ARG jupyter_key=$jupyter_key
RUN jupyter notebook --generate-config && \
    sed -i "s/#c.NotebookApp.certfile = .*/c.NotebookApp.certfile = u'\/shared_volume\/certs\/fullchain1.pem'/" ~/.jupyter/jupyter_notebook_config.py && \
    sed -i "s/#c.NotebookApp.keyfile = .*/c.NotebookApp.keyfile = u'\/shared_volume\/certs\/privkey1.pem'/" ~/.jupyter/jupyter_notebook_config.py && \
    sed -i "s/#c.NotebookApp.password = .*/c.NotebookApp.password = u'$jupyter_key'/" ~/.jupyter/jupyter_notebook_config.py && \
    sed -i 's/#c.NotebookApp.port = .*/c.NotebookApp.port = 9999/' ~/.jupyter/jupyter_notebook_config.py

##Set locales for OpenDataCube
RUN echo "export LC_ALL=C.UTF-8" >> ~/.profile
RUN echo "export LANG=C.UTF-8" >> ~/.profile
#Set variables
ARG mount_point=$mount_point
RUN echo "export mount_point=$mount_point" >> ~/.profile
RUN echo "export CURL_CA_BUNDLE=/etc/ssl/certs/ca-certificates.crt" >> ~/.profile
#Use python3
RUN echo "alias python=python3" >> ~/.bash_aliases
#Antares3:
RUN echo "export PATH=$PATH:/home/madmex_user/.local/bin/" >> ~/.profile

#Config files for datacube and antares
RUN ln -sf $mount_point/.antares ~/.antares
RUN ln -sf $mount_point/.datacube.conf ~/.datacube.conf

#Final settings
WORKDIR /home/madmex_user/
VOLUME ["/shared_volume"]
ENTRYPOINT ["/usr/local/bin/dumb-init", "--"]
Define variable jupyter_key with the hashed password previously generated and build docker image with next commands (needs a docker hub account):
DOCKER_REPOSITORY=<name of your docker hub repository>

DOCKER_IMAGE_NAME=antares3-k8s-cluster-dependencies

DOCKER_IMAGE_VERSION=latest

sudo docker build --build-arg jupyter_key=$jupyter_key --build-arg mount_point=$mount_point -t $DOCKER_REPOSITORY/$DOCKER_IMAGE_NAME:$DOCKER_IMAGE_VERSION .

sudo docker login

sudo docker push $DOCKER_REPOSITORY/$DOCKER_IMAGE_NAME:$DOCKER_IMAGE_VERSION

sudo docker rmi $DOCKER_REPOSITORY/$DOCKER_IMAGE_NAME:$DOCKER_IMAGE_VERSION
Copy configuration files for antares and open datacube to efs volume
Create .antares and .datacube.conf files in EFS:
Locate where is running the efs-provisioner:
REGION=$(curl -s http://instance-data/latest/dynamic/instance-identity/document|grep region|awk -F\" '{print $4}')

export AWS_DEFAULT_REGION=$REGION

efs_prov=$(kubectl get pods --show-all |grep efs-|cut -d' ' -f1)

efs_prov_ip=$(kubectl describe pods $efs_prov|grep Node:|sed -n 's/.*ip-\(.*\).us-.*/\1/p'|sed -n 's/-/./g;p')

efs_prov_ip_publ=$(aws ec2 describe-instances --filters "Name=private-ip-address,Values=$efs_prov_ip"|jq -r '.Reservations[].Instances[].PublicDnsName')
Ssh to that node and enter to efs docker container with
execcommand:
$ssh -i <key>.pem admin@$efs_prov_ip_publ

id_container_efs=$(sudo docker ps|grep efs-provisioner|grep quay|cut -d' ' -f1)

$sudo docker exec -it $id_container_efs /bin/sh
Note
Make sure this <key>.pem has 400 permissions: $chmod 400 <key>.pem.
Create antares and datacube configuration files:
$vi /persistentvolumes/.antares

$vi /persistentvolumes/.datacube.conf
.antares:
# Django settings
SECRET_KEY=
DEBUG=True
DJANGO_LOG_LEVEL=DEBUG
ALLOWED_HOSTS=
# Database
DATABASE_NAME=
DATABASE_USER=
DATABASE_PASSWORD=
DATABASE_HOST=
DATABASE_PORT=
# Datacube
SERIALIZED_OBJECTS_DIR=
INGESTION_PATH=
DRIVER=<s3aio or 'NETCDF CF'>
INGESTION_BUCKET=<name of s3 bucket>
# Query and download
USGS_USER=
USGS_PASSWORD=
SCIHUB_USER=
SCIHUB_PASSWORD=
# Misc
BIS_LICENSE=
TEMP_DIR=
.datacube.conf:
[user]
default_environment: <datacube or s3aio_env, first for netcdf and second for s3>

[datacube]
db_hostname: <database_host>
db_database: <database_name>
db_username: <database_user>
db_password: <database_password>

execution_engine.use_s3: <True or False>

[s3aio_env]
db_hostname: <database_host>
db_database: <database_name>
db_username: <database_user>
db_password: <database_password>
index_driver: <default or s3aio_index>, first for netcdf and second for s3>

execution_engine.use_s3: <True or False>
Copy
.antaresand.datacube.confto/persistentvolumes/efs-pvc-<id>:
$cp /persistentvolumes/.antares /persistentvolumes/efs-pvc-<id>

$cp /persistentvolumes/.datacube.conf /persistentvolumes/efs-pvc-<id>
Create directory
certsand copy cert and private key (already created in kubernetes dashboard section):
$mkdir /persistentvolumes/efs-pvc-<id>/certs
$vi /persistentvolumes/efs-pvc-<id>/certs/fullchain1.pem
$vi /persistentvolumes/efs-pvc-<id>/certs/privkey1.pem
Exit efs docker container.
Deployments for dask scheduler and worker
Deployment for dask scheduler
Use next antares3-scheduler.yaml file to create container for dask scheduler (example for a t2.medium instance):
kind: Deployment
apiVersion: extensions/v1beta1
metadata:
  name: antares3-scheduler
spec:
  replicas: 1 ##### This is the number of containers that are going to be deployed. For scheduler just 1 is needed.
  template:
    metadata:
      labels:
        app: antares3-scheduler-app
    spec:
      containers:
      - name: antares3-scheduler
        imagePullPolicy: Always #IfNotPresent
        image: madmex/antares3-k8s-cluster-dependencies:latest #Docker image to be used for dask scheduler/worker container
        command: ["/bin/bash", "-c", "pip3 install --user git+https://github.com/CONABIO/antares3.git@develop --upgrade --no-deps && /home/madmex_user/.local/bin/antares init && jupyter lab --ip=0.0.0.0 --no-browser & /usr/local/bin/dask-scheduler --port 8786 --bokeh-port 8787 --scheduler-file /shared_volume/scheduler.json"]
        ports:
         - containerPort: 8787
         - containerPort: 8786
         - containerPort: 9999
        env:
         - name: mount_point
           value: /shared_volume
         - name: LC_ALL
           value: C.UTF-8
         - name: LANG
           value: C.UTF-8
         - name: GDAL_DATA
           value: /usr/share/gdal/2.2/
        resources:
         requests:
          cpu: ".5"   ##### This value depends of type of AWS instance chosen
          memory: 1Gi ##### This value depends of type of AWS instance chosen
         limits:
          cpu: "1"    ##### This value depends of type of AWS instance chosen
          memory: 2Gi ##### This value depends of type of AWS instance chosen
        volumeMounts:
         - name: efs-pvc
           mountPath: "/shared_volume"
         - name: dshm
           mountPath: /dev/shm
      volumes:
       - name: efs-pvc
         persistentVolumeClaim:
          claimName: efs
       - name: dshm ##### This is needed for opendatacube S3 functionality
         emptyDir:
          medium: Memory
Create deployment of antares3-scheduler with:
$kubectl create -f antares3-scheduler.yaml
or if you already have created it you can scale this deployment by using kubernetes dashboard:
To visualize bokeh create Kubernetes service with next service.yaml (modify port according to your preference):
kind: Service
apiVersion: v1
metadata:
  name: antares3-scheduler-bokeh
spec:
  type: LoadBalancer
  ports:
    - port: 8787
      targetPort: 8787
      protocol: TCP
      nodePort: 30000 ##### Select port of your preference
  selector:
    app: antares3-scheduler-app
Execute:
$kubectl create -f service.yaml
Note
Create in security groups of master and nodes of Kubernetes a rule to visualize bokeh with the port you chose.
State of cluster
<public DNS of master or node (depends where dask-scheduler container is running)>:30000
To use jupyterlab create Kubernetes service with next service-jupyter-lab.yaml (modify port according to your preference):
kind: Service
apiVersion: v1
metadata:
  name: antares3-jupyter-lab
spec:
  type: LoadBalancer
  ports:
    - port: 9999
      targetPort: 9999
      protocol: TCP
      nodePort: 30001 ##### Select port of your preference
  selector:
    app: antares3-scheduler-app
Execute:
$kubectl create -f service-jupyter-lab.yaml
Note
Create in security groups of master and nodes of Kubernetes a rule to access jupyterlab with the port you chose.
JupyterLab
https://<location>:30001 (if you selected this port in service-jupyter-lab.yaml)
Deployment for dask worker
Use next antares3-worker.yaml file to create containers for dask workers.
Example for t2.large instances which have 2 cores. Two instances were started. See Managing Compute Resources for Containers , Assign CPU Resources to Containers and Pods and Assign Memory Resources to Containers and Pods to learn how to change the requests and limits values for cpu and memory of containers. Also see Best Practices in Dask Kubernetes for dask-workers parameters.
apiVersion: extensions/v1beta1
kind: Deployment
metadata:
name: antares3-worker
namespace: default
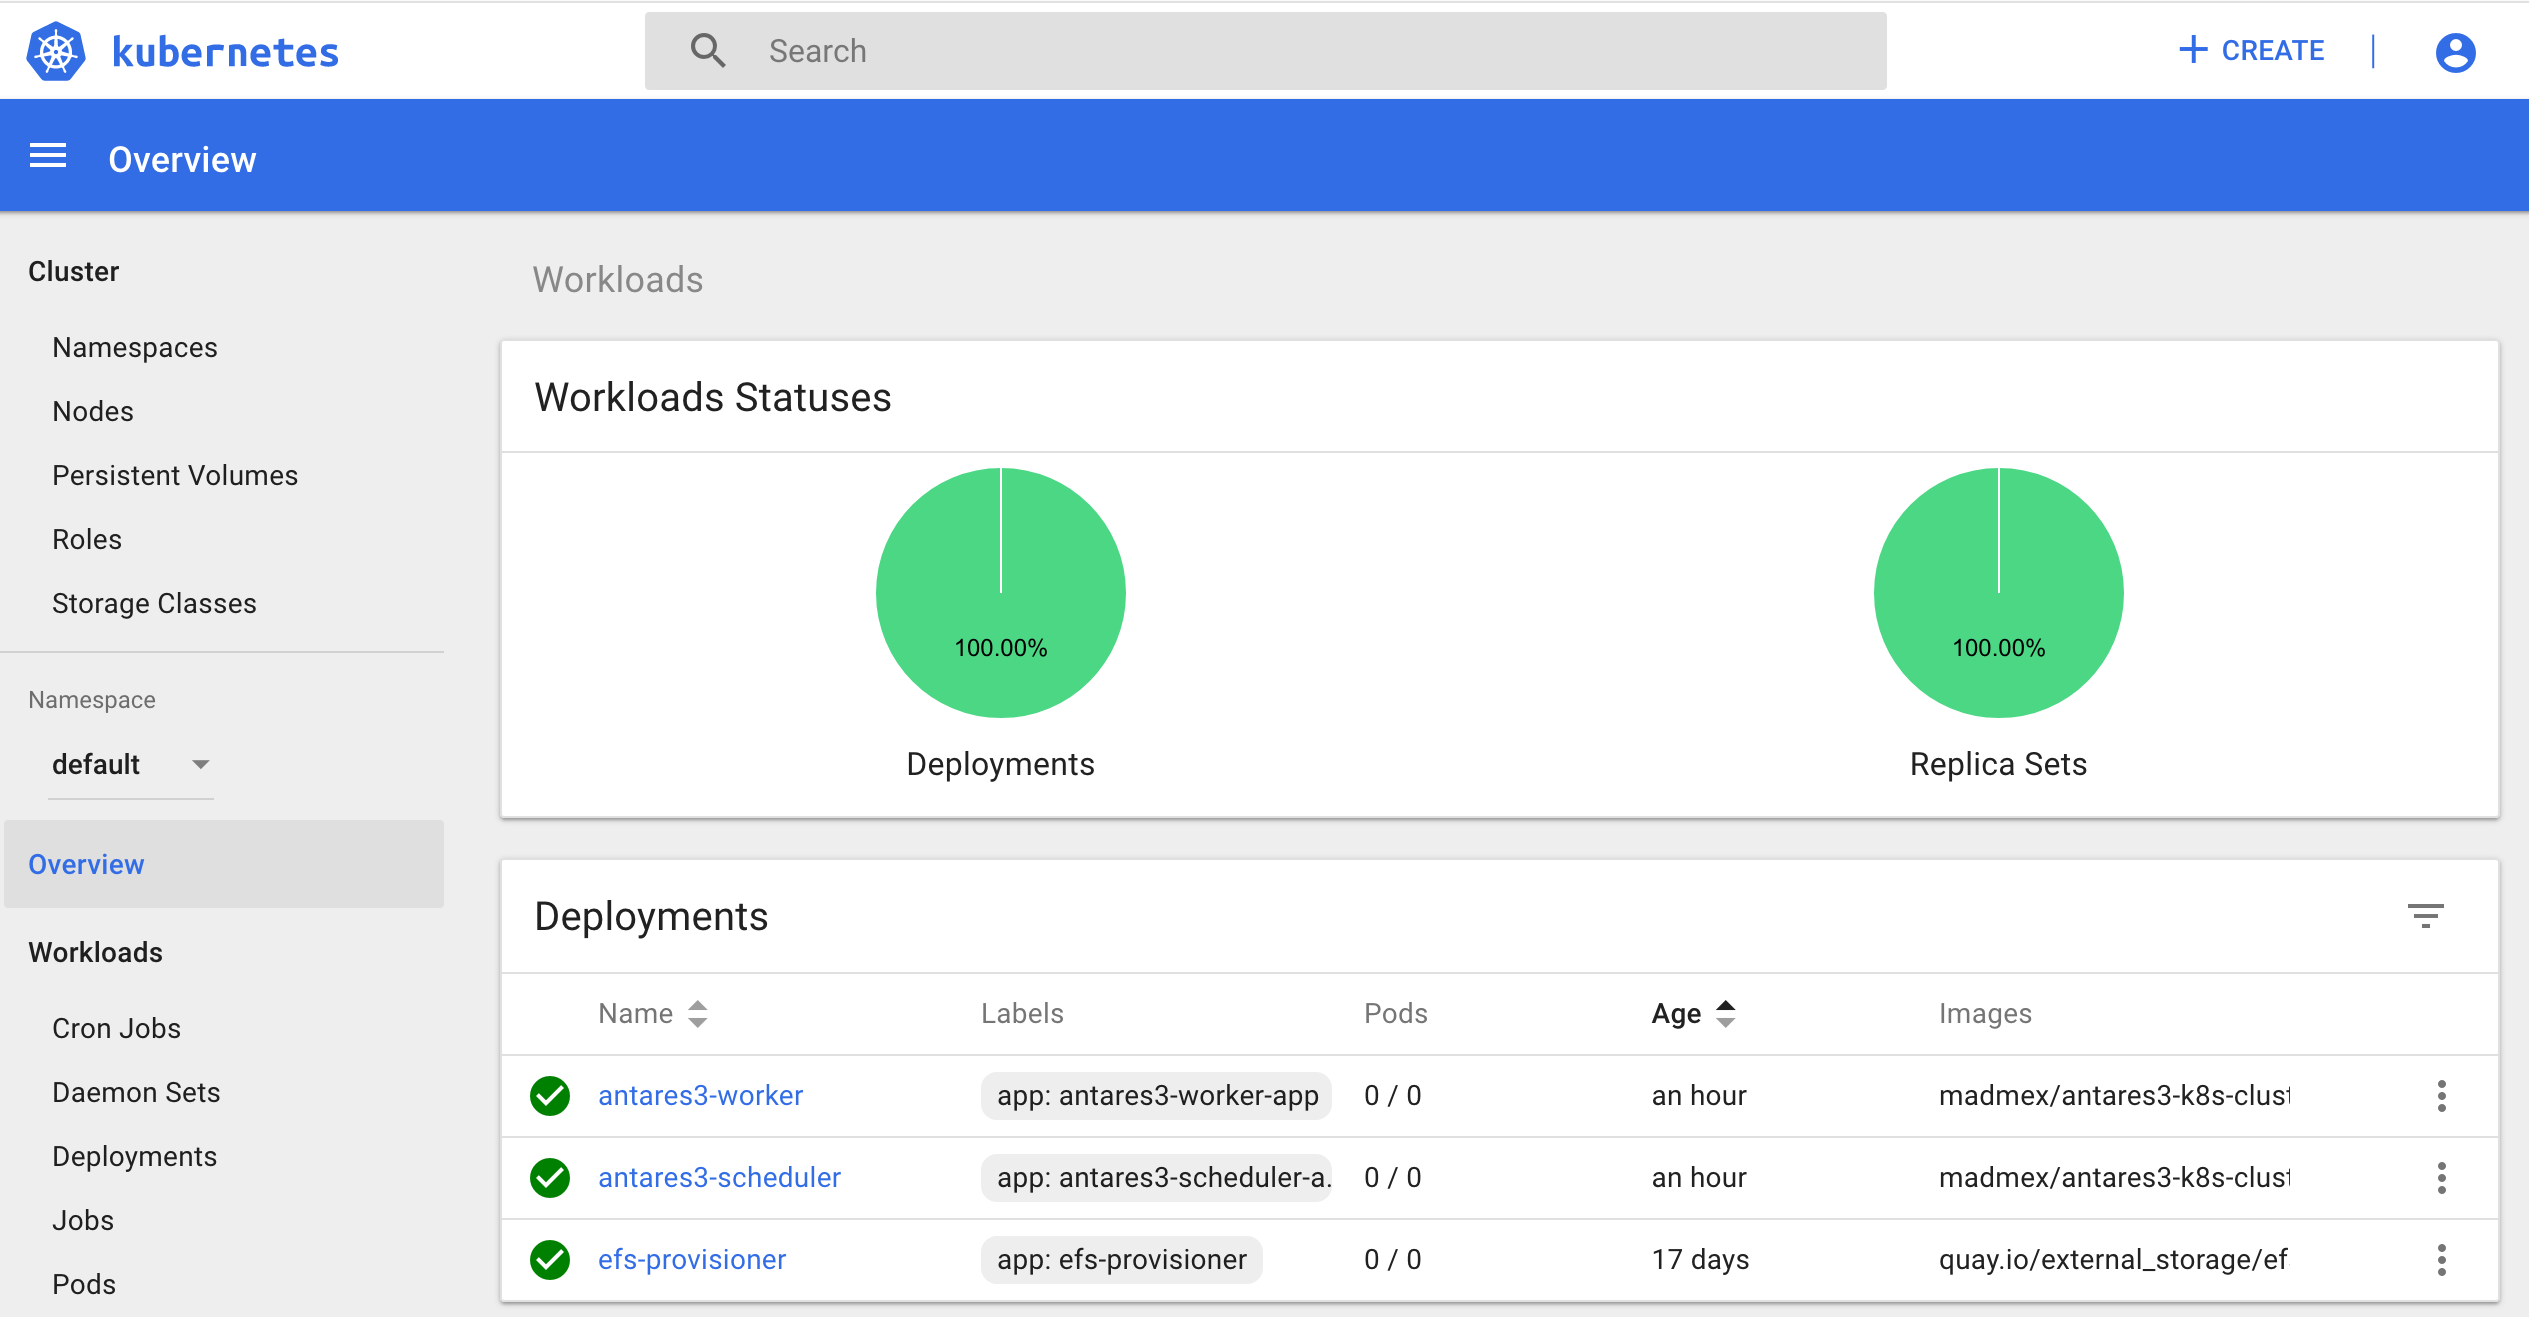
spec:
replicas: 4 ##### This is the number of containers that are going to be deployed. Change it if more containers are needed
template:
metadata:
labels:
app: antares3-worker-app
spec:
#restartPolicy: Never
containers:
- name: antares3-worker
imagePullPolicy: Always
image: madmex/antares3-k8s-cluster-dependencies:latest #Docker image to be used for dask scheduler/worker container
command: ["/bin/bash", "-c", "pip3 install --user git+https://github.com/CONABIO/antares3.git@develop --upgrade --no-deps && /home/madmex_user/.local/bin/antares init && /usr/local/bin/dask-worker --worker-port 8786 --nthreads 1 --no-bokeh --memory-limit 4GB --death-timeout 60 --scheduler-file /shared_volume/scheduler.json"]
ports:
- containerPort: 8786
env:
- name: LC_ALL
value: C.UTF-8
- name: LANG
value: C.UTF-8
- name: mount_point
value: "/shared_volume"
- name: GDAL_DATA
value: /usr/share/gdal/2.2/
resources:
requests:
cpu: ".5" ##### This value depends of type of AWS instance chosen
memory: 3.5Gi ##### This value depends of type of AWS instance chosen
limits:
cpu: "1" ##### This value depends of type of AWS instance chosen
memory: 4Gi ##### This value depends of type of AWS instance chosen
volumeMounts:
- name: efs-pvc
mountPath: "/shared_volume/"
- name: dshm
mountPath: /dev/shm
volumes:
- name: efs-pvc
persistentVolumeClaim:
claimName: efs
- name: dshm ##### This is needed for opendatacube S3 functionality
emptyDir:
medium: Memory
#sizeLimit: '1Gi' #This is not working right now. Containers use all instance's capacity
Create deployment of antares3-worker with:
$kubectl create -f antares3-worker.yaml
Note
Use kubectl scale deployments/antares3-worker --replicas=2 to have two dask-worker containers.
or if you already have created it you can scale this deployment by using kubernetes dashboard:
For log in to dask-scheduler:
Locate where is running the scheduler:
REGION=$(curl -s http://instance-data/latest/dynamic/instance-identity/document|grep region|awk -F\" '{print $4}')

export AWS_DEFAULT_REGION=$REGION

$dask_scheduler_pod=$(kubectl get pods --show-all |grep scheduler|cut -d' ' -f1)

$dask_scheduler_ip=$(kubectl describe pods $dask_scheduler_pod|grep Node:|sed -n 's/.*ip-\(.*\).us-.*/\1/p'|sed -n 's/-/./g;p')

$dask_scheduler_ip_publ=$(aws ec2 describe-instances --filters "Name=private-ip-address,Values=$dask_scheduler_ip"|jq -r '.Reservations[].Instances[].PublicDnsName')
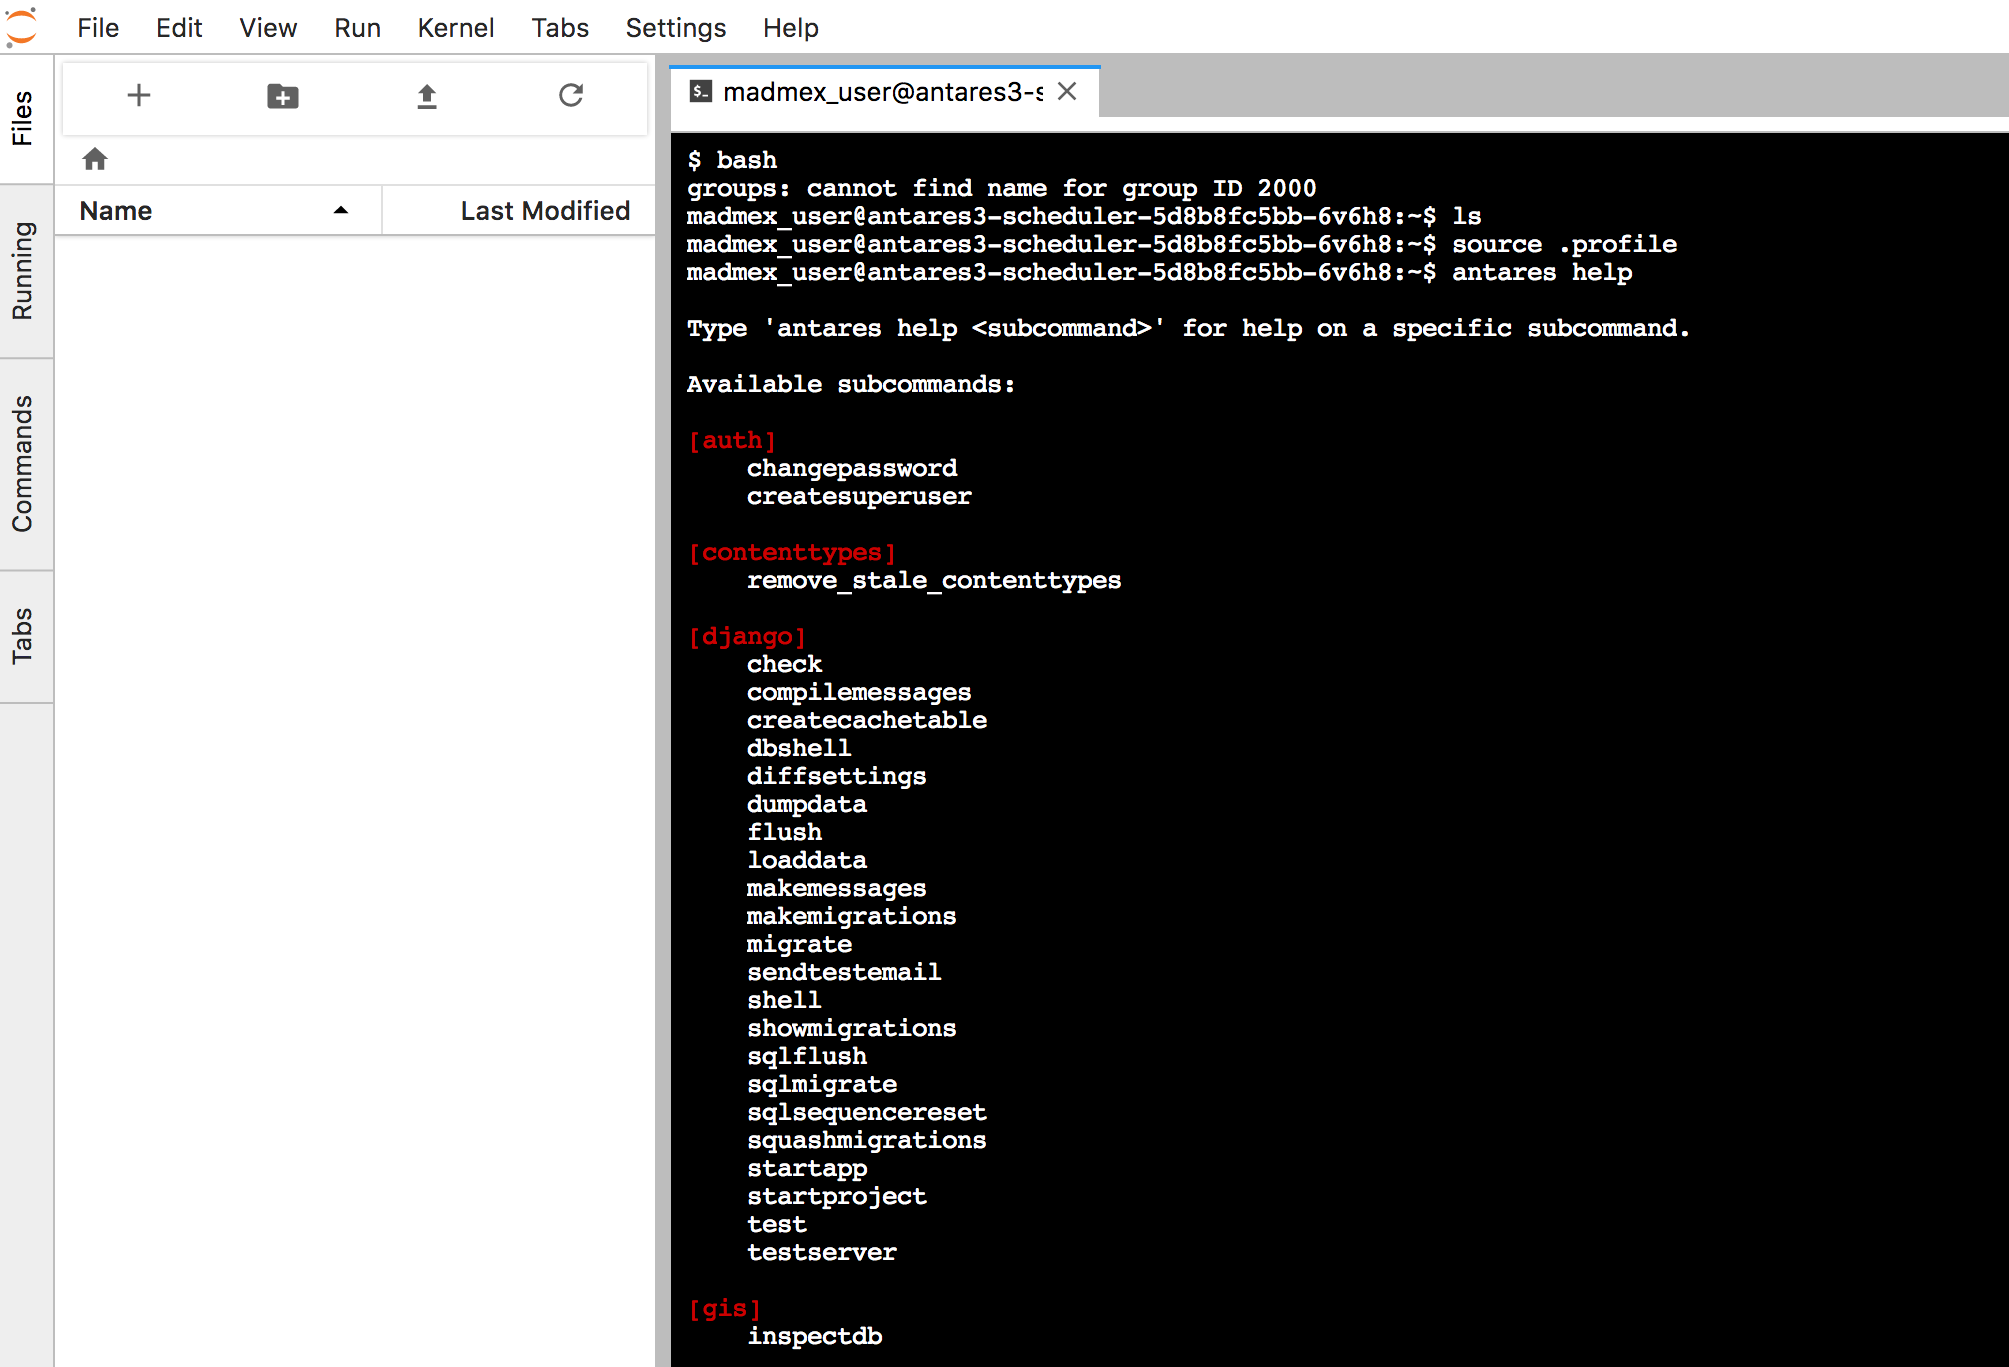
Using <key>.pem of user kops do a ssh and enter to docker container of dask-scheduler with exec command:
$ssh -i <key>.pem admin@$dask_scheduler_ip_publ

id_container_scheduler=$(sudo docker ps|grep antares3-scheduler|grep madmex|cut -d' ' -f1)

$sudo docker exec -it id_container_scheduler bash
Note
Make sure this <key>.pem has 400 permissions: $chmod 400 <key>.pem.
Run an example
In dask-scheduler container execute in a python environment:
from dask.distributed import Client
import os
client = Client(scheduler_file=os.environ['mount_point']+'/scheduler.json')

def square(x):
    return x ** 2

def neg(x):
    return -x

A = client.map(square, range(10))
B = client.map(neg, A)
total = client.submit(sum, B)
total.result()
-285
total
<Future: status: finished, type: int, key: sum-ccdc2c162ed26e26fc2dc2f47e0aa479>
client.gather(A)
[0, 1, 4, 9, 16, 25, 36, 49, 64, 81]
from
<public DNS of master or node (depends where dask-scheduler container is running)>:30000/graph
we have:
Init Open DataCube
Log in where dask-scheduler container is running.
Open DataCube
Attention
Open Datacube supports NETCDF CF and S3 drivers for storage (see Open DataCube Ingestion Config). Different software dependencies are required for different drivers and different datacube system init command.
$datacube -v system init --no-init-users
Note
The --no-init-users flag is necessary for both drivers so we don’t have errors related to permissions. See this question in StackOverFlow .
For both drivers you can execute the following to check that Open DataCube is properly setup:
$datacube system check
Note
For S3 driver additionally you can check the following tables are created in your database:
\dt agdc.*

s3_dataset
s3_dataset_chunk
s3_dataset_mapping
Init Antares3 to ingest country borders
Antares setup consists of setting up the database schemas, ingesting country borders in a table and deploy the configuration files specific to each dataset.
Although in the antares3-scheduler.yaml and antares3-worker.yaml ther is an antares init command, if we want to ingest country borders we need to log in to dask-scheduler container and execute (for example to ingest Mexico’s border):
$source ~/.profile

$antares init -c mex
Notes
To execute antares or datacube commands:
Locate where is running the scheduler:
REGION=$(curl -s http://instance-data/latest/dynamic/instance-identity/document|grep region|awk -F\" '{print $4}')

export AWS_DEFAULT_REGION=$REGION

$dask_scheduler_pod=$(kubectl get pods --show-all |grep scheduler|cut -d' ' -f1)

$dask_scheduler_ip=$(kubectl describe pods $dask_scheduler_pod|grep Node:|sed -n 's/.*ip-\(.*\).us-.*/\1/p'|sed -n 's/-/./g;p')

$dask_scheduler_ip_publ=$(aws ec2 describe-instances --filters "Name=private-ip-address,Values=$dask_scheduler_ip" |jq -r '.Reservations[].Instances[].PublicDnsName')
Using <key>.pem of user kops do a ssh and enter to docker container of dask-scheduler with exec command:
$ssh -i <key>.pem admin@$dask_scheduler_ip_publ

id_container_scheduler=$(sudo docker ps|grep antares3-scheduler|grep madmex|cut -d' ' -f1)

$sudo docker exec -it id_container_scheduler bash
Note
Make sure this <key>.pem has 400 permissions: $chmod 400 <key>.pem.
Or use jupyterlab access:
<https://<location>:30001 (if you selected this port in service-jupyter-lab.yaml)
To scale down cluster export next bash variables:
export DOMAIN_NAME="antares3.conabio-route53.net"
export CLUSTER_ALIAS="k8s-deployment"
export CLUSTER_FULL_NAME="${CLUSTER_ALIAS}.${DOMAIN_NAME}"
export KOPS_STATE_STORE="s3://${CLUSTER_FULL_NAME}-state"
export KUBERNETES_VERSION="1.9.0"
export EDITOR=nano
REGION=$(curl -s http://instance-data/latest/dynamic/instance-identity/document|grep region|awk -F\" '{print $4}')
export AWS_DEFAULT_REGION=$REGION
Scale down components of kubernetes dashboard:
$kubectl -n kube-system scale deployments/kubernetes-dashboard --replicas=0
$kubectl -n kube-system scale deployments/monitoring-grafana --replicas=0
$kubectl -n kube-system scale deployments/heapster --replicas=0
$kubectl -n kube-system scale deployments/monitoring-influxdb --replicas=0
and those of antares3:
$kubectl scale deployments/antares3-worker --replicas=0

$kubectl scale deployments/antares3-scheduler --replicas=0
and scale down efs-provisioner deployment:
$kubectl scale deployments/efs-provisioner --replicas=0
or use kubernetes dashboard to scale down deployments antares3-worker, antares3-scheduler and `` efs-provisioner``:
and scale down components of kubernetes dashboard.
Proceed to scale down nodes and master:
#set minSize and maxSize to 0 for nodes
$kops edit ig nodes --name $CLUSTER_FULL_NAME

#Next line is just to see what changes are going to be applied
$kops update cluster $CLUSTER_FULL_NAME

#Apply changes
$kops update cluster $CLUSTER_FULL_NAME --yes

#To scale down master:
#to retrieve type and region where master is located

$kops get instancegroups

#set minSize and maxSize to 0

$kops edit ig master-us-west-2a --name $CLUSTER_FULL_NAME

#Next line is just to see what changes are going to be applied
$kops update cluster $CLUSTER_FULL_NAME

#Apply changes
$kops update cluster $CLUSTER_FULL_NAME --yes
If you scale down the cluster and want to start it again, export next bash variables:
export DOMAIN_NAME="antares3.conabio-route53.net"
export CLUSTER_ALIAS="k8s-deployment"
export CLUSTER_FULL_NAME="${CLUSTER_ALIAS}.${DOMAIN_NAME}"
export KOPS_STATE_STORE="s3://${CLUSTER_FULL_NAME}-state"
export KUBERNETES_VERSION="1.9.0"
export EDITOR=nano
REGION=$(curl -s http://instance-data/latest/dynamic/instance-identity/document|grep region|awk -F\" '{print $4}')
export AWS_DEFAULT_REGION=$REGION
and execute:
#set minSize and maxSize to 1
$kops edit ig master-us-west-2a --name $CLUSTER_FULL_NAME

$kops update cluster $CLUSTER_FULL_NAME

$kops update cluster $CLUSTER_FULL_NAME --yes

#set minSize and maxSize to desired number of nodes. You also can select instance type
$kops edit ig nodes --name $CLUSTER_FULL_NAME

#Next line is just to see what changes are going to be applied
$kops update cluster $CLUSTER_FULL_NAME

#Apply changes
$kops update cluster $CLUSTER_FULL_NAME --yes
Scale up components of kubernetes dashboard:
$kubectl -n kube-system scale deployments/monitoring-grafana --replicas=1
$kubectl -n kube-system scale deployments/heapster --replicas=1
$kubectl -n kube-system scale deployments/monitoring-influxdb --replicas=1
$kubectl -n kube-system scale deployments/kubernetes-dashboard --replicas=1
And scale up efs-provisioner deployment :
$kubectl scale deployments/efs-provisioner --replicas=1
and scale deployments for dask-scheduler and dask-worker (see Deployments for dask scheduler and worker section).
or use kubernetes dashboard once components of kubernetes dashboard are running. First scale efs, then scheduler and finally workers:
Before deleting cluster, delete deployment of kubernetes dashboard with it’s components, EFS, deployment of services: bokeh and jupyterlab, delete mount targets of EFS and delete instance, subnet and security group of RDS:
For example, to delete deployment of components of kubernetes dashboard, EFS and service (bokeh visualization and jupyterlab):
#delete admin-user created:
$kubectl -n kube-system delete serviceaccount admin-user
$kubectl -n kube-system delete ClusterRoleBinding admin-user

#delete dashboard components:
$kubectl -n kube-system delete deploy/kubernetes-dashboard
$kubectl -n kube-system delete svc/kubernetes-dashboard
$kubectl -n kube-system delete rolebinding kubernetes-dashboard-minimal
$kubectl -n kube-system delete role kubernetes-dashboard-minimal
$kubectl -n kube-system delete serviceaccount kubernetes-dashboard
$kubectl -n kube-system delete secret kubernetes-dashboard-certs kubernetes-dashboard-key-holder

#delete heapster components:
$kubectl -n kube-system delete deploy/heapster
$kubectl -n kube-system delete deploy/monitoring-grafana deploy/monitoring-influxdb
$kubectl -n kube-system delete svc/heapster svc/monitoring-grafana svc/monitoring-influxdb
$kubectl -n kube-system delete serviceaccount heapster
$kubectl -n kube-system delete clusterrolebinding heapster

#delete deployment of efs
$kubectl delete deployment efs-provisioner
#delete deployments of services
$kubectl delete service antares3-scheduler-bokeh
$kubectl delete service antares3-jupyter-lab
To delete mount targets of EFS (assuming there’s three subnets):
REGION=$(curl -s http://instance-data/latest/dynamic/instance-identity/document|grep region|awk -F\" '{print $4}')

export AWS_DEFAULT_REGION=$REGION

efs_id=<id of efs>

mt_id1=$(aws efs describe-mount-targets --file-system-id $efs_id|jq -r '.MountTargets[]|.MountTargetId'|tr -s '\n' ' '|cut -d' ' -f1)

mt_id2=$(aws efs describe-mount-targets --file-system-id $efs_id|jq -r '.MountTargets[]|.MountTargetId'|tr -s '\n' ' '|cut -d' ' -f2)

mt_id3=$(aws efs describe-mount-targets --file-system-id $efs_id|jq -r '.MountTargets[]|.MountTargetId'|tr -s '\n' ' '|cut -d' ' -f3)

$aws efs delete-mount-target --mount-target-id $mt_id1

$aws efs delete-mount-target --mount-target-id $mt_id2

$aws efs delete-mount-target --mount-target-id $mt_id3
If the instances of Kubernetes cluster (and thereby containers) need access to a bucket of S3, you can use next commands after a policy was created. Here we assume that the bucket where we have data is
bucket_exampleand the name of the policy is:policy_exampleand it has entries:
{
    "Version": "2012-10-17",
    "Statement": [
        {
            "Sid": "VisualEditor0",
            "Effect": "Allow",
            "Action": [
                "s3:ListBucket",
                "s3:GetBucketLocation"
            ],
            "Resource": [
                "arn:aws:s3:::bucket_example",
            ]
        },
        {
            "Sid": "VisualEditor1",
            "Effect": "Allow",
            "Action": [
                "s3:PutObject",
                "s3:GetObject",
                "s3:DeleteObject"
            ],
            "Resource": [
                "arn:aws:s3:::bucket_example/*",
            ]
        }
    ]
}
name_of_policy=policy_example

arn_of_policy=$(aws iam list-policies --scope=Local| jq -r '.Policies[]|select(.PolicyName=="'$name_of_policy'")|.Arn')

name_of_role_masters=masters.$CLUSTER_FULL_NAME #This is the role name created by command kops create cluster ...

$aws iam attach-role-policy --policy-arn $arn_of_policy --role-name $name_of_role_masters

name_of_role_nodes=nodes.$CLUSTER_FULL_NAME #This is the role name created by command kops create cluster ...

$aws iam attach-role-policy --policy-arn $arn_of_policy --role-name $name_of_role_nodes
Note
Before deleting cluster delete policy that was attached to roles masters.$CLUSTER_FULL_NAME and nodes.$CLUSTER_FULL_NAME.